Quickstart guide#
This page provides an introduction to how to use Inductor to prototype, evaluate, improve, and observe your LLM application – both during development and in production.
Install the Inductor CLI and Python API#
The Inductor CLI and Python API enable you to easily use Inductor within your existing development or CI/CD environments. Install them using pip within your terminal:
$ pip install --upgrade inductor
Key term: LLM program#
Within Inductor, we use the term LLM program to refer to a Python function that implements (all or part of) your LLM app, by making one or more calls to LLMs.
Note
LLM programs are free to use any model (or models), such as OpenAI, Anthropic, open source models such as Llama 2, or your own custom models.
LLM programs can (and generally do) include any additional Python code or logic that you’d like (e.g., for retrieval-augmented generation, interaction with other data sources, pre- or post-processing, or anything else).
There is only one constraint on LLM programs: in order to work with Inductor, an LLM program’s arguments and return value must be JSON-serializable (i.e., strings, numbers, booleans, None, dicts, lists, or nested structures of any of the preceding).
You can implement your LLM programs however and wherever you’d like in your codebase. For this walkthrough, we’ll assume that we’re developing an LLM program for generating Python functions (given a description of the parameters that the function should take and what the function should do), as a function named generate_func in a file named code_gen.py:
import openai
from typing import Dict

openai_client = openai.OpenAI(api_key=<ADD YOUR OPENAI API KEY HERE>)

def generate_func(
    param_descriptions: Dict[str, str], action_description: str) -> str:

    # Construct prompt
    prompt = ("Write a Python function named `func` that takes the following "
              "parameters:\n\n")
    prompt += "\n".join(
        f"- {name}: {desc}" for name, desc in param_descriptions.items())
    prompt += "\n\n"
    prompt += f"The function should {action_description}."

    # Generate function
    chat_completion = openai_client.chat.completions.create(
        messages=[{"role": "system", "content": prompt}],
        model="gpt-3.5-turbo")

    # Return
    return chat_completion.choices[0].message.content
If you’d like to follow along interactively:
Copy and paste the code above into a file named
code_gen.py(remember to add your OpenAI API key).Install the OpenAI Python library (which is used in the code above) by running
pip install --upgrade openaiin your terminal.
Note
The example LLM program above happens to use the OpenAI API, but that is not a requirement for using Inductor. Inductor would work equally well if the LLM program utilized any other model or LLM API.
Start a Custom Playground#
Inductor’s Custom Playgrounds enable you to auto-generate a powerful, instantly shareable playground for your LLM app with a single CLI command - and run it within your environment. Custom Playgrounds provide a developer-first way to prototype and iterate on LLM programs fast, as well as loop collaborators (including less-technical collaborators) into your development process. In particular, with Custom Playgrounds you can
Auto-generate a custom playground UI that is customized to your LLM program.
Run your playground in your environment with your code and data.
Accelerate your iteration speed with an easy, powerful way to interact with your LLM program and then systematically evaluate it (with auto-generated UI, hot-reloading, auto-logging, test suite integration, and more).
Collaborate with colleagues by securely sharing your work, collecting feedback, and leveraging their expertise (for prompt engineering and more).
To start a Custom Playground for your LLM program, run the inductor playground CLI command in your terminal, and pass it the fully qualified name of your LLM program (in the format my.module:my_function). For instance, for this walkthrough, you would run
$ inductor playground code_gen:generate_func
This will prompt you to log in (or create an Inductor account for free if you don’t already have one), and will then open the web UI for your playground in your browser.
Once there, you can immediately start interacting with your LLM program by filling in the input fields for your LLM program’s arguments, and clicking the “Run LLM app” button.
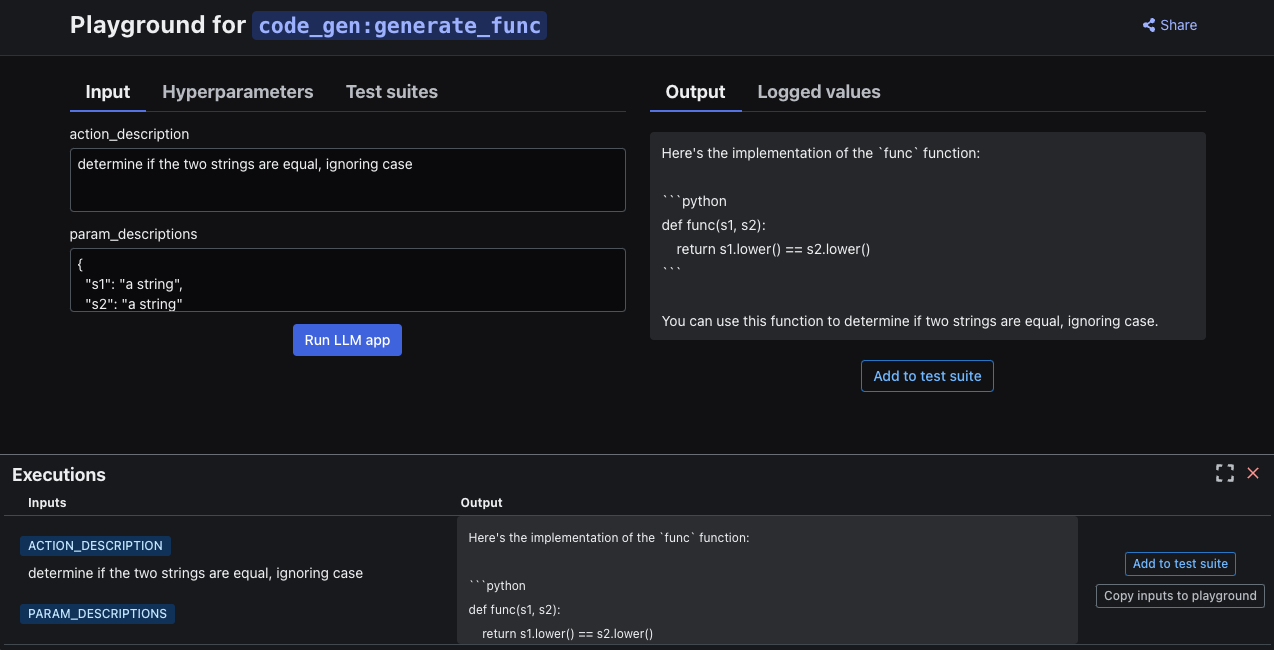
All interactive executions of your LLM program in your playground are automatically logged (and displayed in the “Executions” panel at the bottom of the screen), so that you can easily replay them (by clicking on the “Copy inputs to playground” button) and never lose your work.
As explained in the subsections below, Custom Playgrounds also include a number of additional powerful features.
Tip
Custom Plagyrounds automatically hot-reload as you change the code of your LLM program.
Note
Custom Playgrounds use a WebSocket connection to your machine, in order to be able to run directly and securely against your code and environment. Ensure that the machine on which you ran the inductor playground command remains remains internet-connected while using your Custom Playground.
Logging intermediate values#
To better understand your LLM program’s behavior, and further diagnose any issues, you can easily log any value produced during its execution. Simply import inductor in your LLM program’s code, and add a call of the following form anywhere you’d like:
inductor.log(value_to_log, name="Optional human-readable name for logged value")
For example, in this walkthrough’s LLM program, you can log the fully constructed prompt by adding the following line:
inductor.log(prompt, name="Fully constructed prompt")
When you execute your LLM program in your playground, any such logged values will be displayed in the “Logged values” tab.
For more information about logging intermediate values, see the Log intermediate values section of these docs.
Using hyperparameters#
You can test different variations of your LLM program using hyperparameters, which are settings for your LLM program that you can flexibly define and use however you’d like in your code. You can use hyperparameters to control any aspect of your LLM program - such as the model that it uses, its prompt, its retrieval-augmentation settings, or anything else.
To introduce a hyperparameter in your LLM program, simply import inductor in your LLM program’s code, and add a call of the following form (which will return the value of the named hyperparameter, or the default value if no hyperparameter value is configured externally to your LLM program’s code):
inductor.hparam("hyperparameter name", default_value)
For example, to enable controlling the model used by the LLM program in our walkthrough, you can update the LLM program’s code as follows:
    # Generate function
    chat_completion = openai_client.chat.completions.create(
        messages=[{"role": "system", "content": prompt}],
        model=inductor.hparam("model", "gpt-3.5-turbo"))
After making this change, run the LLM program in the playground UI and click on the “Hyperparameters” tab, which will then display a field for every inductor.hparam call in your LLM program. These fields enable you to interactively control the values of your LLM program’s hyperparameters (i.e., its settings) from within your playground, so that you can experiment with using different values.
For more information on hyperparameters, see the Hyperparameters section of these docs.
Add playground executions to test suites#
After executing your LLM program in your playground, you can add executions to new or existing test suites by clicking the “Add to test suite” button. Test suites enable you to re-run entire collections of LLM program inputs with a single click.
Adding an execution to a test suite will create a new test case within the test suite with the input parameters used for that execution. You can view a history of past playground executions in the Executions panel at the bottom of the playground UI, where you can also add past executions to test suites using the “Add to test suite” button.
After you add one or more playground executions to a test suite, you will be able to view and run your test suite(s) from within the “Test suites” tab in the playground UI.
For more information on test suites, see the Test suites section below
Using custom playgrounds to build multi-turn chat apps#
Custom Playgrounds can also easily be used when building multi-turn chat apps. To do so, simply annotate one of the arguments of your LLM program with the inductor.ChatSession type. For example:
# In simple_chat.py

import inductor
import openai

openai_client = openai.OpenAI(api_key=<ADD YOUR OPENAI API KEY HERE>)

def chat_func(session: inductor.ChatSession) -> str:

    # Construct system prompt
    system_prompt = ("You are a friendly chat assistant.  Place the greatest "
                     "emphasis on the user's most recent message, which is:\n")
    system_prompt += session.messages[-1].content

    # Generate response
    chat_completion = openai_client.chat.completions.create(
        messages=(
            [{"role": "system", "content": system_prompt}] +
            session.openai_messages()),
        model="gpt-3.5-turbo")

    # Return
    return chat_completion.choices[0].message.content
You can then start a Custom Playground for the above LLM program as you would for any other LLM program:
$ inductor playground simple_chat:chat_func
The resulting playground will provide an auto-generated chat interface, and will automatically construct and pass the ChatSession object to your LLM program whenever you submit a new chat message in the playground web UI.
In the chat setting, Custom Playgrounds also continue to provide the other features introduced above, including hot-reloading, the ability to add additional input arguments beyond the ChatSession argument (e.g., you could add an additional customer_id argument if building a customer service chatbot), the ability to log intermediate values, and the ability to use hyperparameters.
Note
As illustrated above, the inductor.ChatSession object has a single field named messages, which is a List of inductor.ChatMessage objects giving the the chat messages in the current chat session in the order in which they were issued. Within Custom Playgrounds, Inductor automatically constructs the ChatSession for you and ensures that the final message in messages is the most recent message issued by the user whenever your LLM program is executed (as a result of a message being submitted in the playground web UI). Outside of the Custom Playgrounds context, you can also construct ChatSession objects yourself. The inductor.ChatSession and inductor.ChatMessage types are defined as follows:
class ChatMessage(pydantic.BaseModel):
    """A chat message.

    Attributes:
        role: Role of the entity that issued this message.
            - "program" indicates that the message was issued by the LLM
                program.
            - "user" indicates that the message was issued by the user of the
                LLM program.
        content: Content of the message.
    """
    role: Literal["program", "user"]
    content: str

class ChatSession(pydantic.BaseModel):
    """Information about a chat session.

    Attributes:
        messages: Chat messages in the order in which they were issued.
    """
    messages: List[ChatMessage]

    def openai_messages(self) -> List[Dict]:
        """Returns messages in format accepted by the OpenAI API.

        Specifically, this method updates each message's `role` field to conform
        to the role values accepted by the OpenAI API.  See the
        [OpenAI docs](https://platform.openai.com/docs/api-reference/chat/create)
        for more information about the OpenAI API's message format.
        """
        ...
Test suites#
Inductor’s test suites enable you to systematically test and improve your LLM app. Each test suite consists of
A set of test cases, each containing a set of input (i.e., argument) values for your LLM program. Each test case can optionally also include an example of an output value that should be considered high-quality or correct.
A set of quality measures specifying how to evaluate the output of your LLM program. Quality measures can be programmatic (i.e., powered by Python functions), human (i.e., requiring human evaluation), or LLM-powered (i.e., rigorously use LLMs to automate more of your human-style evaluations).
Test suites can be defined in your codebase either in a lightweight YAML format (fast and easy to write and read), or using our Python API (useful either when necessary to create test suites fully programmatically, or when running in a Jupyter or Colab notebook). In either case, you can write, and version, your test suites right alongside your code.
Initialize your first test suite using the Inductor CLI, by running the following in your terminal:
$ inductor test
When you run inductor test for the first time, you will be prompted to log in to Inductor via your browser; please do so by navigating to the login link displayed in your terminal (and press “Confirm” if prompted with a “Device Confirmation” screen in your browser).
The CLI (in your terminal) will then prompt you to answer a few questions in order to output a scaffold for your first test suite file. For this walkthrough, answer those questions as follows:
Accept the default test suite file path:
test_suite.yamlEnter
quickstartas the test suite name.Feel free to skip entering a test suite description by pressing Enter.
Enter
code_gen:generate_funcas the fully qualified name (FQN) of your LLM program.Finally, press enter to “Create test suite and write contents.”
Initialize your first test suite by placing the following code in a .py file – for this walkthrough, name the file test_suite.py:
import code_gen
import inductor

test_suite = inductor.TestSuite(
    "quickstart",                  # Name that identifies your test suite
    code_gen.generate_func)        # Your LLM program
Note
Test suite names must contain only alphanumeric characters, dashes, or underscores.
Add test cases to your test suite#
Inductor makes it easy to define and manage your test suites in a simple YAML format, which you can write, edit, store, and version alongside your code.
Open your newly created test suite file (test_suite.yaml). As you can see, it is already populated with a config block containing your test suite’s metadata, as well as a scaffold for your first test case:
- test:
    inputs:
      param_descriptions: <REPLACE WITH VALUE>
      action_description: <REPLACE WITH VALUE>
Fill in values for the test case’s LLM program inputs. For example:
- test:
    inputs:
      param_descriptions: {"s": "a string"}
      action_description: "determine if the given string is a palindrome"
To add more test cases, simply copy, paste, and modify. For example:
- test:
    inputs:
      param_descriptions: {"df": "a Pandas DataFrame", "col": "a DataFrame column name"}
      action_description: >
        determine the number of distinct values in the column of df given
        by col

- test:
    inputs:
      param_descriptions: {"s1": "a string", "s2": "a string"}
      action_description: "determine if the two strings are equal, ignoring case"
Inductor makes it easy to define and manage your test suites via an ergonomic Python API, which you can use to define, edit, and version your test suites alongside your code.
Add a test case to your test suite by adding the following to your test suite file (test_suite.py):
test_suite.add(
    inductor.TestCase({
        "param_descriptions": {"s": "a string"},
        "action_description": "determine if the given string is a palindrome"}))
To add more test cases, you can call the add() method multiple times and/or pass a list to the add() method. For example:
test_suite.add([
    inductor.TestCase({
        "param_descriptions": {"df": "a Pandas DataFrame", "col": "a DataFrame column name"},
        "action_description": "determine the number of distinct values in the column of df given by col"}),
    inductor.TestCase({
        "param_descriptions": {"s1": "a string", "s2": "a string"},
        "action_description": "determine if the two strings are equal, ignoring case"})
])
You can add, remove, or modify test cases at any time by modifying your test suite file.
Tip
Coming soon: create test suites via Inductor’s web UI, in addition to via YAML and the Python API.
Run your test suite#
To run your test suite, use the Inductor CLI:
$ inductor test test_suite.yaml
You will see output like the following in your terminal:
Running 3 test cases (1 run each) ...
Go to https://app.inductor.ai/test-suite/run/44 to view results.
[?] Open in browser? (Y/n):
Test Cases ━━━━━━━━━━━━━━━━━━━━━━━━━━━━━━━━━━━━━━━━ 100% 0:00:00
Run complete.
Tip
Run inductor test --help in your terminal to see more information about the inductor test command and the flags that it accepts.
To run your test suite, add the following line to the end of your test suite file (test_suite.py):
test_suite.run()
Then, run your test suite file using the Python interpreter via your terminal:
$ python test_suite.py
When you run your test suite for the first time, you will be prompted to log in to Inductor via your browser; please do so by navigating to the login link displayed in your terminal (and press “Confirm” if prompted with a “Device Confirmation” screen in your browser).
You will then see output like the following in your terminal:
Running 3 test cases (1 run each) ...
Go to https://app.inductor.ai/test-suite/run/44 to view results.
Test Cases ━━━━━━━━━━━━━━━━━━━━━━━━━━━━━━━━━━━━━━━━ 100% 0:00:00
Run complete.
Open the displayed link in your browser to view the results of running the test suite. For example:
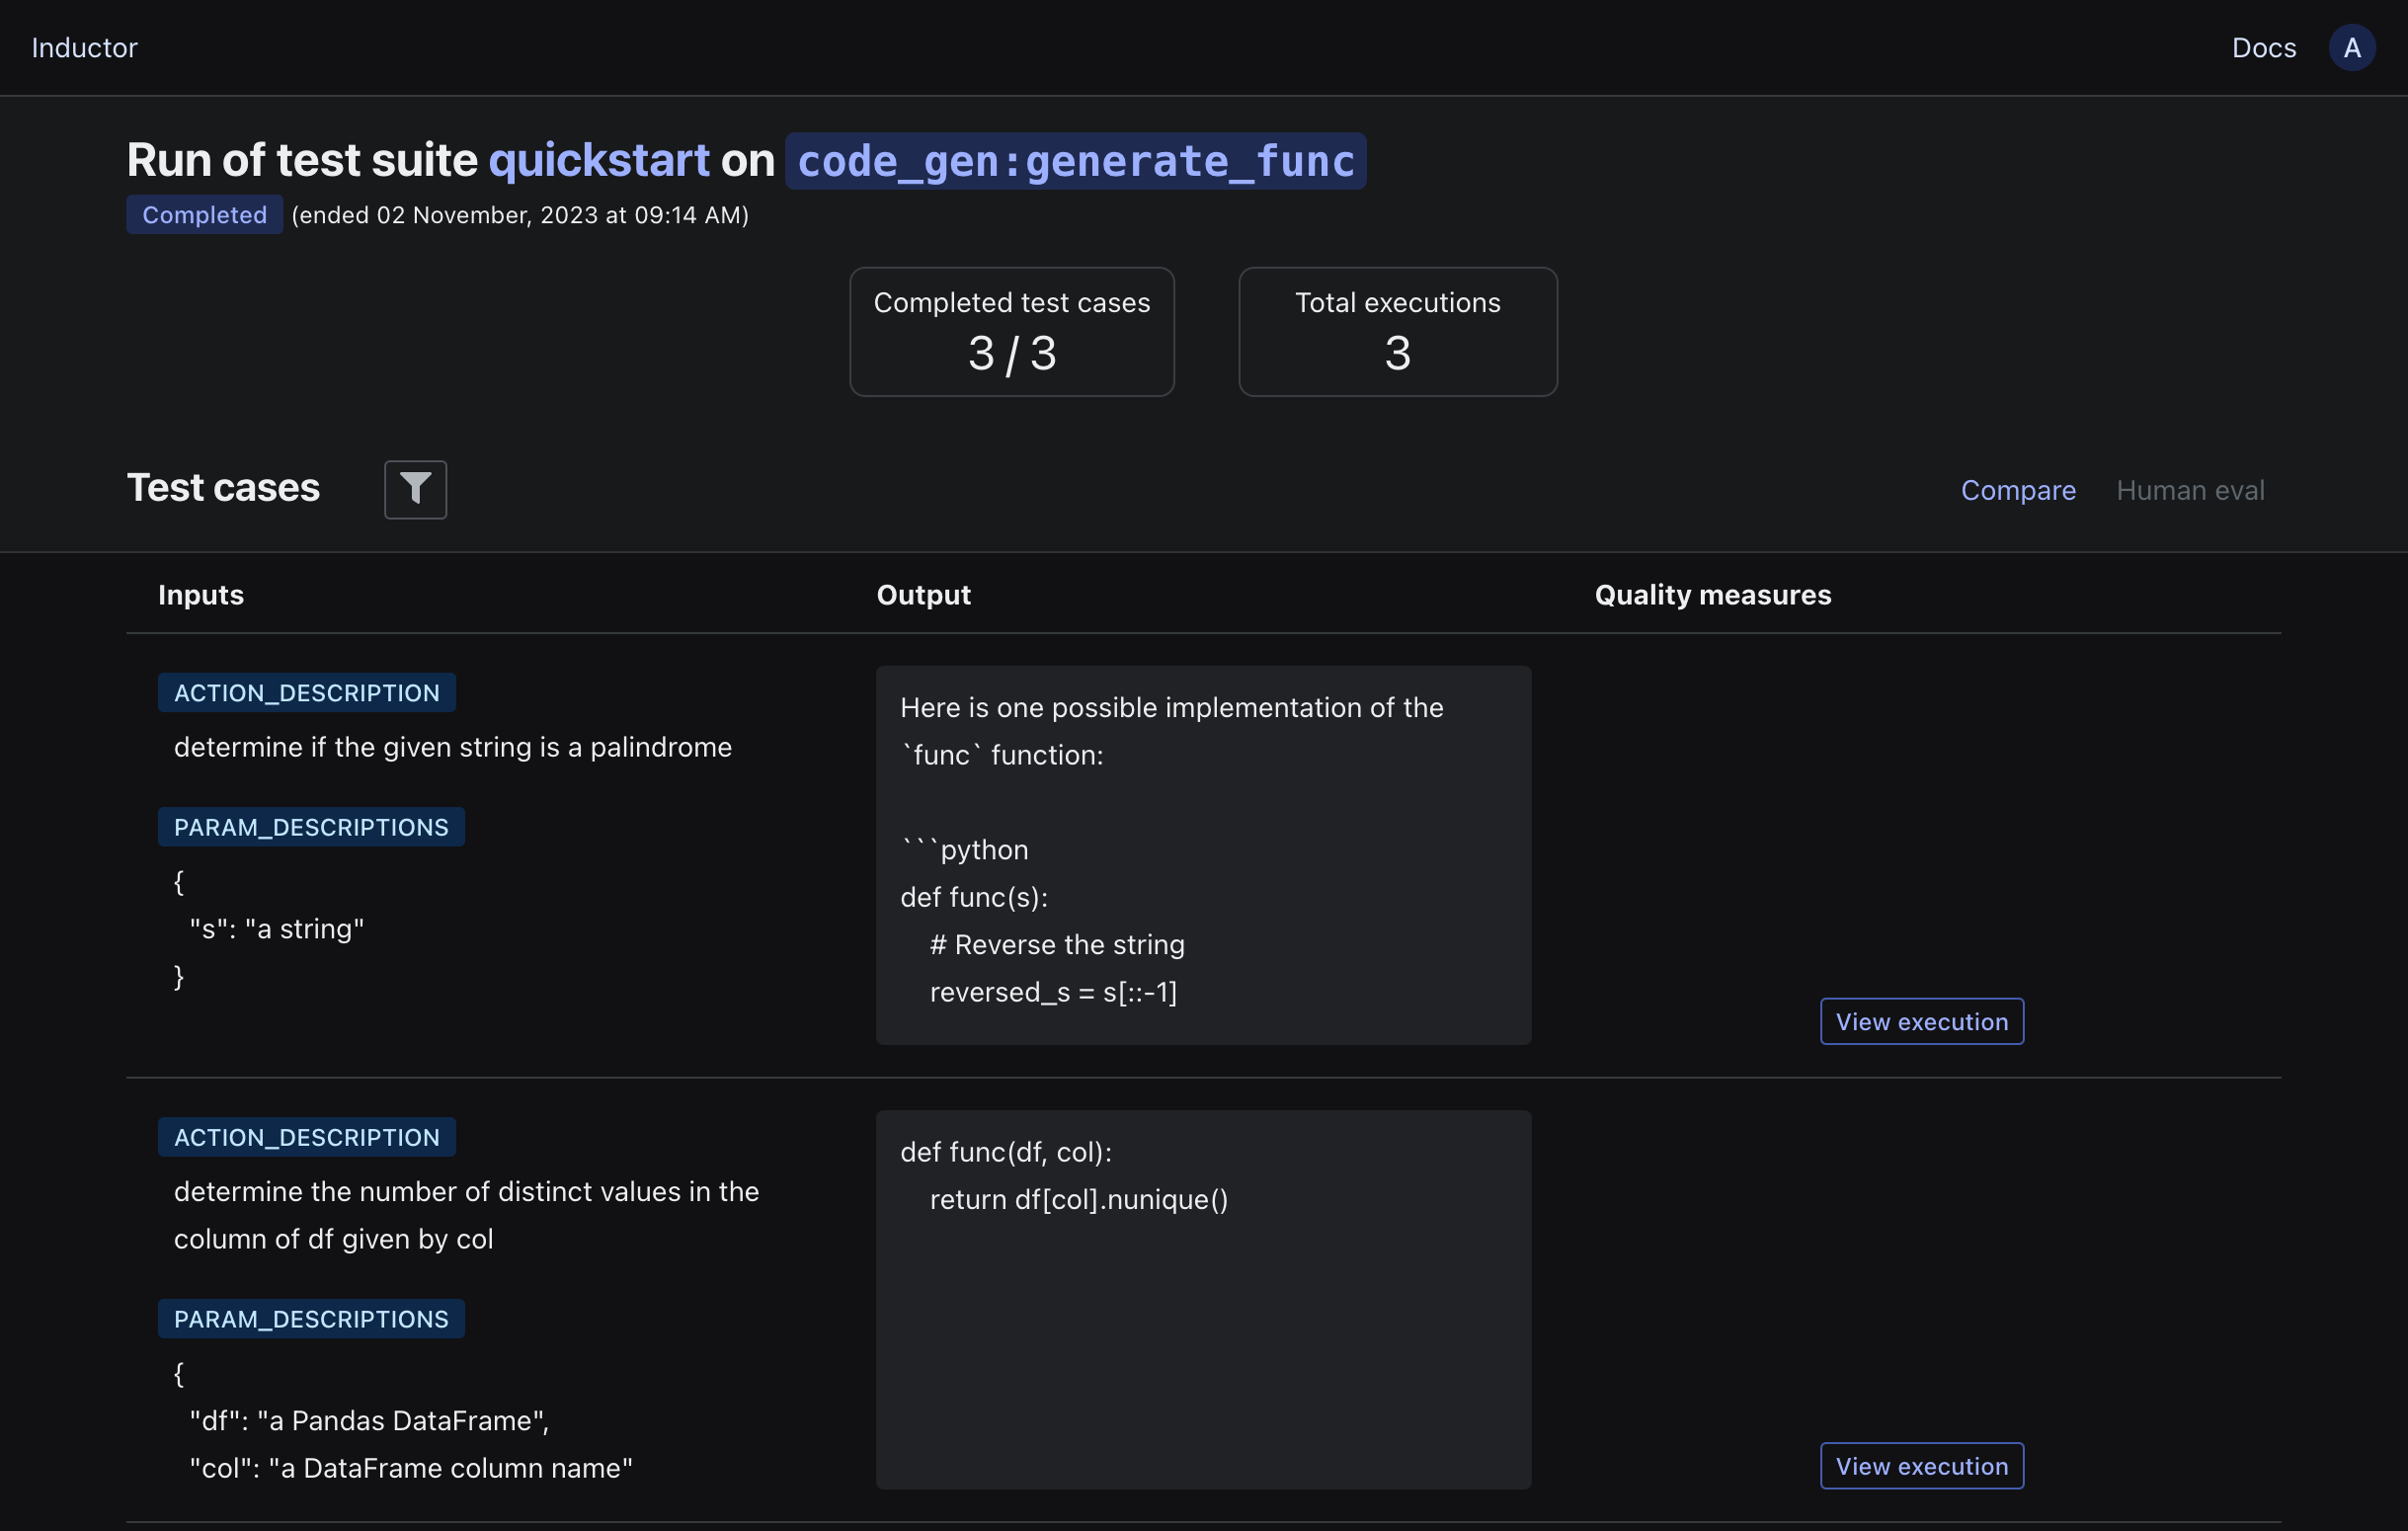
Currently, the results only consist of the inputs and outputs of your LLM program. Next, let’s add some quality measures to systematically assess your LLM program’s behavior.
Add quality measures to your test suite#
Quality measures specify how to evaluate the output of your LLM program. Inductor supports
programmatic quality measures (powered by Python functions),
human quality measures (powered by human inspection of LLM program outputs), and
LLM-powered quality measures (powered by applying LLMs to your LLM program outputs; useful to automate more of your human evaluations).
First, let’s define a programmatic quality measure (i.e., a Python function that takes the output of your LLM program as its argument and returns either a boolean or an integer value). Given that our LLM program is intended to generate Python functions, we’d like to verify that the output has valid Python syntax. To do so, we can write the following function:
import ast

def valid_python_syntax(output: str) -> bool:
    """Returns True if output parses as valid Python code, False otherwise."""
    try:
        ast.parse(output)
        return True
    except Exception:
        return False
For this walkthrough, copy and paste that function into a file named code_gen_quality.py.
To add the quality measure to your test suite, add the following to your test suite file (test_suite.yaml):
- quality:
    name: Valid Python syntax
    evaluator: FUNCTION
    evaluation_type: BINARY
    # `spec` here should be the fully qualified name of your quality function
    spec: code_gen_quality:valid_python_syntax
Additionally, let’s add a couple of human quality measures:
- quality:
    name: Correctly implements action
    evaluator: HUMAN
    evaluation_type: BINARY
    # `spec` here should be the instruction or question to be posed to a
    # human evaluator
    spec: Does the generated function correctly implement the specified action?

- quality:
    name: Readability
    evaluator: HUMAN
    evaluation_type: RATING_INT
    spec: >
      What is the level of readability of the generated code?
      (1 = readability could easily be improved, 5 = highly readable)
Now, when you next run your test suite, Inductor will automatically execute the programmatic quality measures and store their results, and also automatically provide a web UI for human evaluators to use to assess any human quality measures.
Rerun your test suite using the Inductor CLI in your terminal:
$ inductor test test_suite.yaml
To add the quality measure to your test suite, add the following to your test suite file (test_suite.py) above your test_suite.run() call:
import code_gen_quality

test_suite.add(
    inductor.QualityMeasure(
        name="Valid Python syntax",
        evaluator="FUNCTION",
        evaluation_type="BINARY",
        # `spec` here should be your quality function
        spec=code_gen_quality.valid_python_syntax))
Additionally, let’s add a couple of human quality measures:
test_suite.add([
    inductor.QualityMeasure(
        name="Correctly implements action",
        evaluator="HUMAN",
        evaluation_type="BINARY",
        # `spec` here should be the instruction or question to be posed to a
        # human evaluator
        spec="Does the generated function correctly implement the specified action?"),
    inductor.QualityMeasure(
        name="Readability",
        evaluator="HUMAN",
        evaluation_type="RATING_INT",
        spec=(
            "What is the level of readability of the generated code? "
            "(1 = readability could easily be improved, 5 = highly readable)"))
])
Now, when you next run your test suite, Inductor will automatically execute the programmatic quality measures and store their results, and also automatically provide a web UI for human evaluators to use to assess any human quality measures.
Rerun your test suite using the Python interpreter in your terminal:
$ python test_suite.py
Open the link that is printed in your terminal:
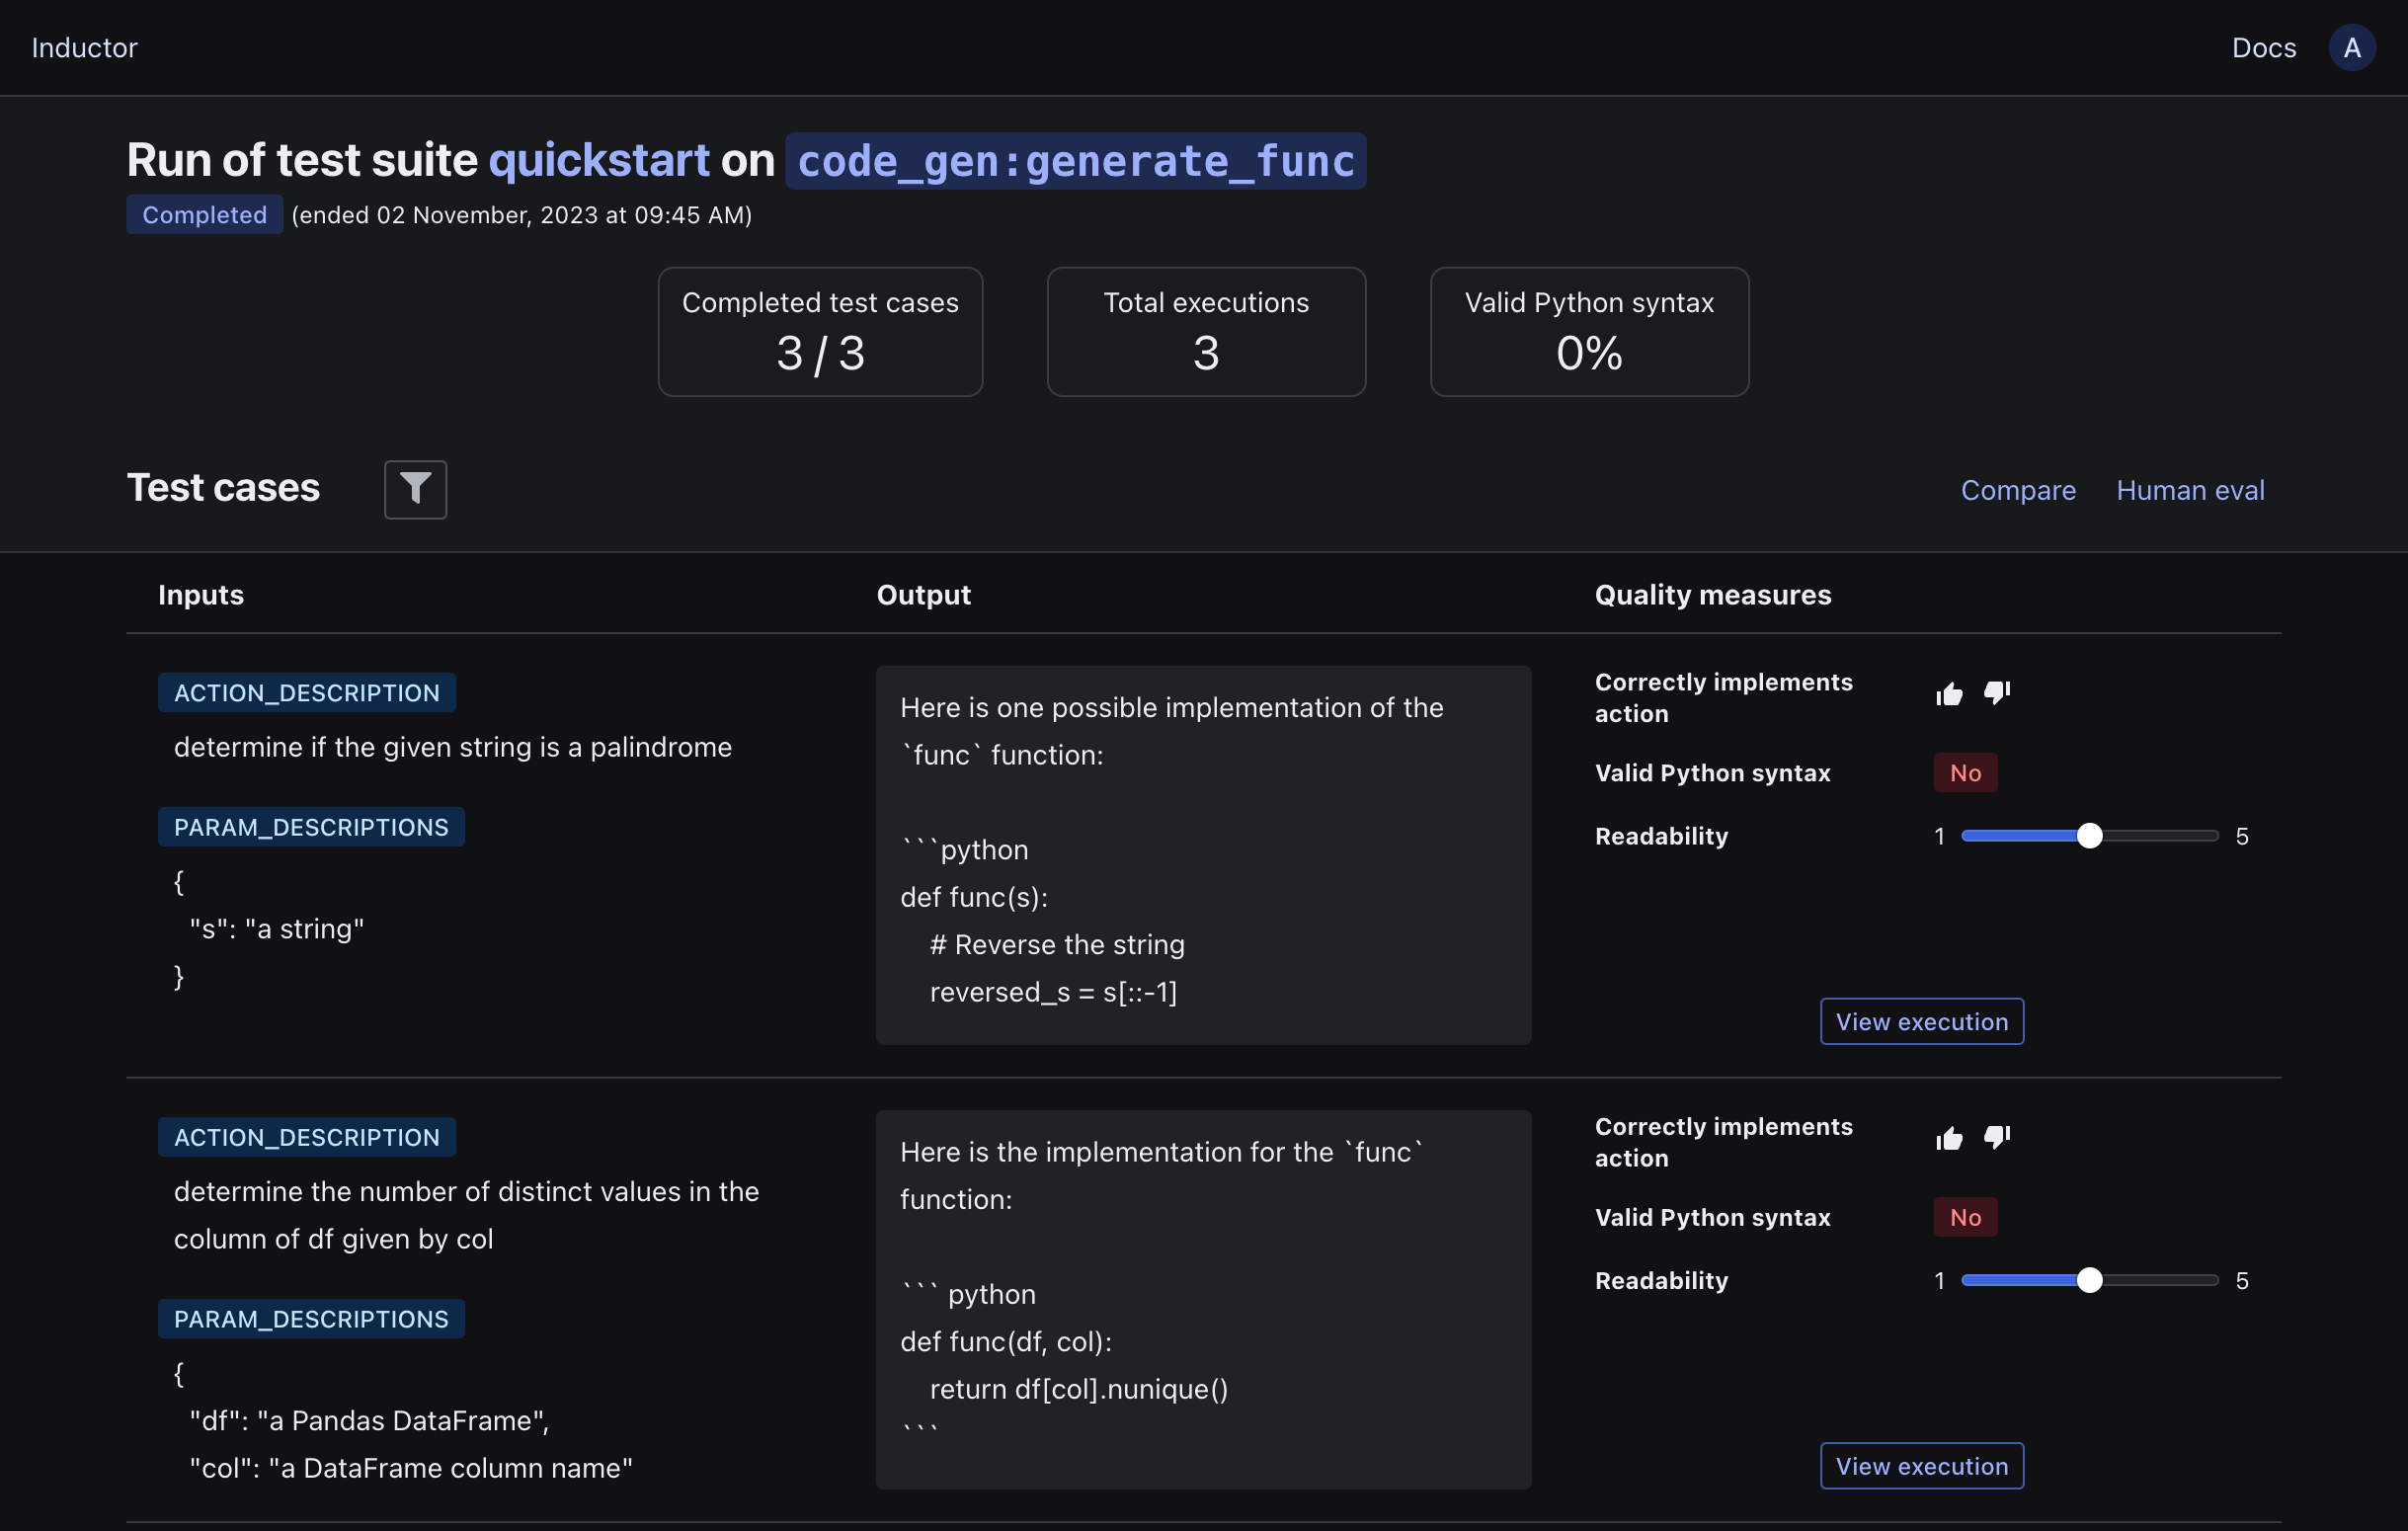
As you can see, your LLM program executions now include the results for all programmatic quality measures (along with summaries of those quality measure results at the top of the page), as well as an inline interface for human evaluation (very useful for rapid human evaluation of small sets of test cases during iterative development).
Tip
Inductor provides rich filtering capabilities, via the filter button adjacent to the “Test cases” heading. This enables you to filter based on LLM program inputs, outputs, and quality measure results to rapidly identify issues and areas for improvement.
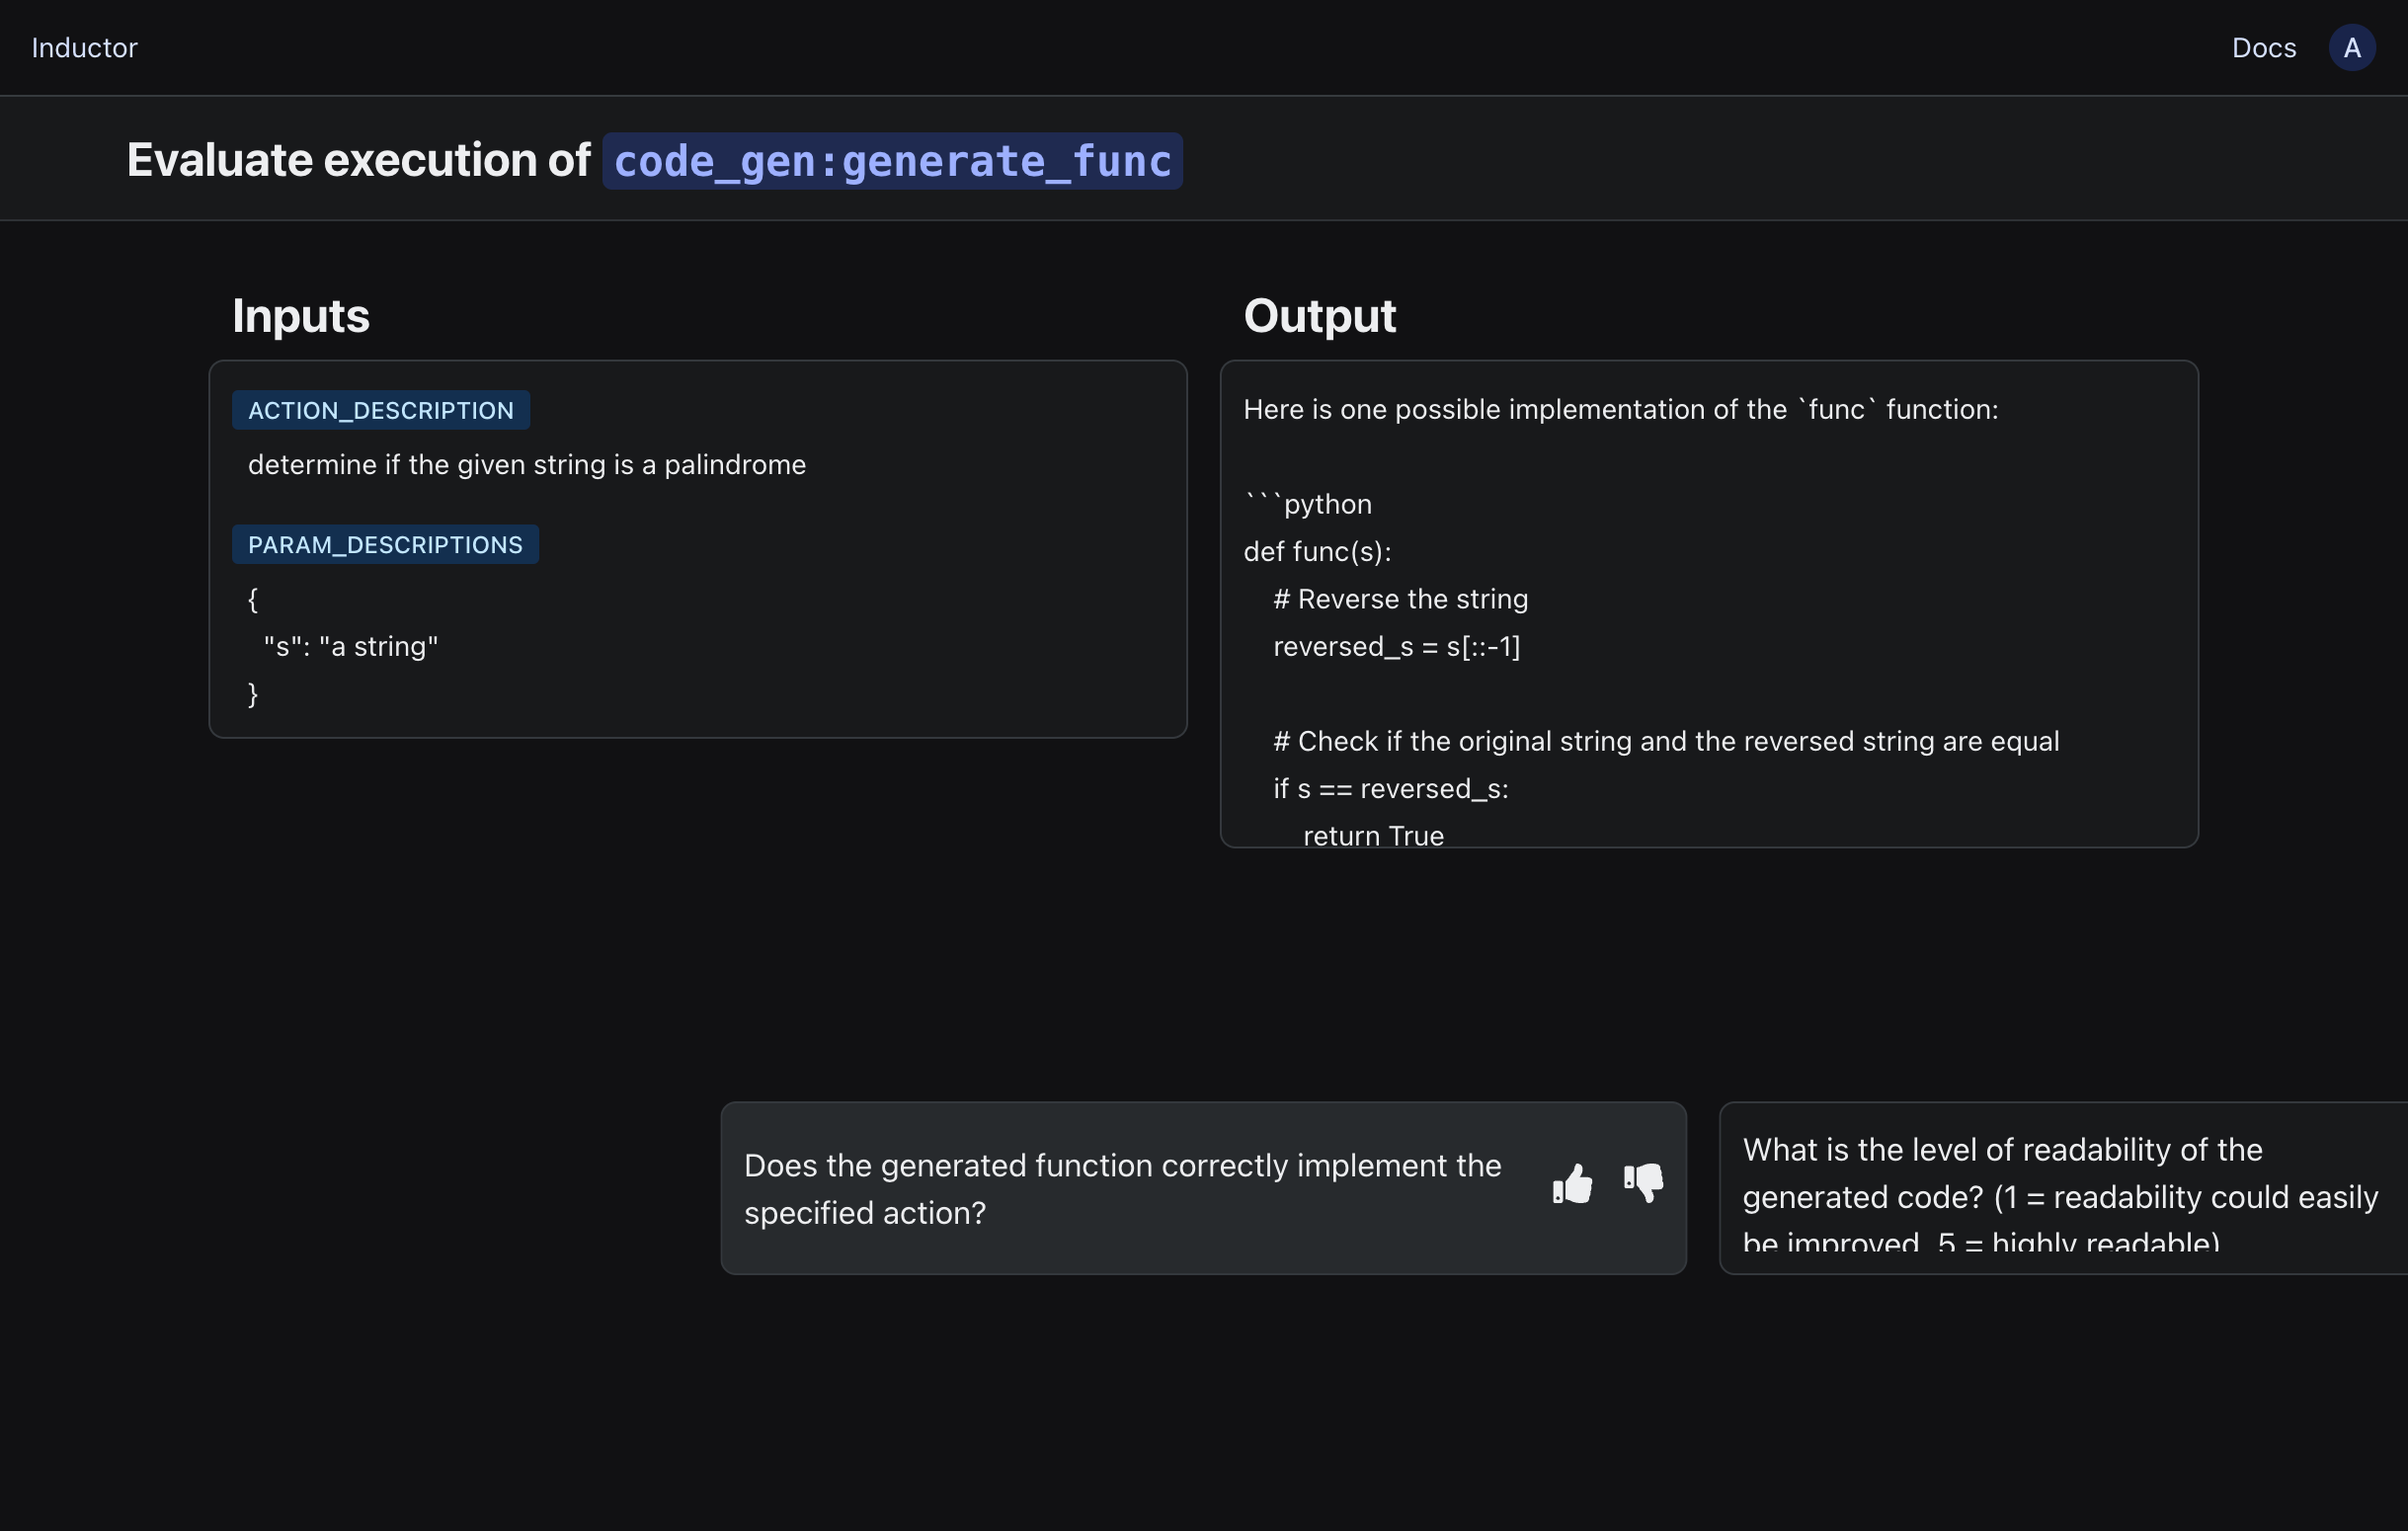
To access a dedicated human evaluation interface for evaluating one test case at a time (very useful for larger-scale human evaluations, or collaboration with other stakeholders or subject matter experts), click the “Human eval” button on the righthand side of the page:
Add an LLM-powered quality measure to your test suite#
You can use LLM-powered quality measures to utilize LLMs to assess your LLM program’s outputs. This is particularly useful for automating more of your evaluations that would otherwise require human inspection.
Note
LLM-powered quality measures run in your environment (like programmatic quality measures), and you are free to use any LLM(s) of your choice.
For this walkthrough, let’s add an LLM-powered quality measure in order to automate assessment of the readability of the code generated by our LLM program.
If you are using the OpenAI API, you can add an LLM-powered quality measure by directly specifying a prompt for your quality measure in your test suite as follows:
- quality:
    name: Readability (LLM-powered)
    evaluator: LLM
    evaluation_type: RATING_INT
    spec:
      model: gpt-3.5-turbo
      prompt: |
        What is the level of readability of the following code?

        {output}

        Note that the above code is intended to {inputs.action_description}.

        Rate readability on a scale of 1 through 5, where 1 means
        that the code's readability can easily be improved (e.g., by adding
        comments or changing spacing), and 5 means that the code above is
        already highly readable (e.g., it is well-structured and appropriately
        commented, with concise though informative names).
import textwrap

test_suite.add(
    inductor.QualityMeasure(
        name="Readability (LLM-powered)",
        evaluator="LLM",
        evaluation_type="RATING_INT",
        spec={
            "model": "gpt-3.5-turbo",
            "prompt": textwrap.dedent("""
                What is the level of readability of the following code?

                {output}

                Note that the above code is intended to {inputs.action_description}.

                Rate readability on a scale of 1 through 5, where 1 means
                that the code's readability can easily be improved (e.g., by adding
                comments or changing spacing), and 5 means that the code above is
                already highly readable (e.g., it is well-structured and appropriately
                commented, with concise though informative names).
            """.strip())
        }))
Given the above quality measure specification, Inductor will automatically use the OpenAI API to run your quality measure as part of your test suite.
Note
To use the above means of specifying an LLM-powered quality measure, you must provide your OpenAI API key via an environment variable named
OPENAI_API_KEY.
Tip
The
modelfield accepts any valid OpenAI model name.Inductor will automatically ensure that your quality measure’s result adheres to your specified
evaluation_type.If you’d like to use a non-OpenAI LLM to power your quality measure, please let us know by emailing
support@inductor.ai. We’re actively adding analogously integrated support for more LLMs based on user demand. That said, you can already use other LLMs to power your quality measure by writing a bit of code as detailed below.
Alternatively, if you would like to use a non-OpenAI LLM, or do more complex processing as part of your LLM-powered quality measure (e.g., to do multiple LLM calls), you can provide the fully qualified name of a Python function that implements your LLM-powered quality measure. The function that you provide must take the output of your LLM program as its first argument, and can optionally also take the inputs and test case that were provided to your LLM program. It must return a value that adheres to your specified evaluation_type, as follows:
If
evaluation_typeis BINARY, then must return of the strings “YES”, “Y”, “TRUE”, “NO”, “N”, or “FALSE” (all treated case-insensitively), or a Python boolean value (i.e.,TrueorFalse).If
evaluation_typeis RATING_INT, then must return one of the strings “1”, “2”, “3”, “4”, or “5”, or one of the integers 1, 2, 3, 4, or 5.
For example, you can implement our LLM-powered readability quality measure as follows (e.g., in a new file named quality_measures.py):
import inductor
import openai
import textwrap
from typing import Any, Dict

openai_client = openai.OpenAI(api_key=<ADD YOUR OPENAI API KEY HERE>)

def readability(
    output: str, inputs: Dict[str, Any], test_case: inductor.TestCase) -> str:

    prompt = textwrap.dedent(f"""
        What is the level of readability of the following code?

        {output}

        Note that the above code is intended to {inputs["action_description"]}.

        Rate readability on a scale of 1 through 5, where 1 means
        that the code's readability can easily be improved (e.g., by adding
        comments or changing spacing), and 5 means that the code above is
        already highly readable (e.g., it is well-structured and appropriately
        commented, with concise though informative names).
    """.strip())

    chat_completion = openai_client.chat.completions.create(
        messages=[{"role": "system", "content": prompt}],
        model="gpt-3.5-turbo")

    # Return
    return chat_completion.choices[0].message.content
Then, specify the quality measure within your test suite as follows:
- quality:
    name: Readability (LLM-powered)
    evaluator: LLM
    evaluation_type: RATING_INT
    # `spec` here should be the fully qualified name of your LLM-powered
    # quality measure function
    spec: quality_measures:readability
import quality_measures

test_suite.add(
    inductor.QualityMeasure(
        name="Readability (LLM-powered)",
        evaluator="LLM",
        evaluation_type="RATING_INT",
        spec=quality_measures.readability))
Determine degree of alignment between an LLM-powered quality measure and a human-powered quality measure#
When using an LLM-powered quality measure, it is often valuable to determine the extent to which it can be “trusted” to automate your human evaluations, by determining the degree to which your LLM-powered quality measure is aligned with your human definitions of quality for your use case.
Given an LLM-powered quality measure, to determine how aligned it is with your human definitions of quality, as expressed via a human-powered quality measure:
Create a test suite that includes both your LLM-powered quality measure and an analogous human-powered quality measure. For example, in the case of our walkthrough, include both the LLM-powered and the human-powered quality measures for “readability” defined above.
Run the test suite.
In the web UI for the test suite run, manually evaluate your human-powered quality measure on your test cases. (Feel free to do so for even a relatively small number of test cases, as this is still typically informative.)
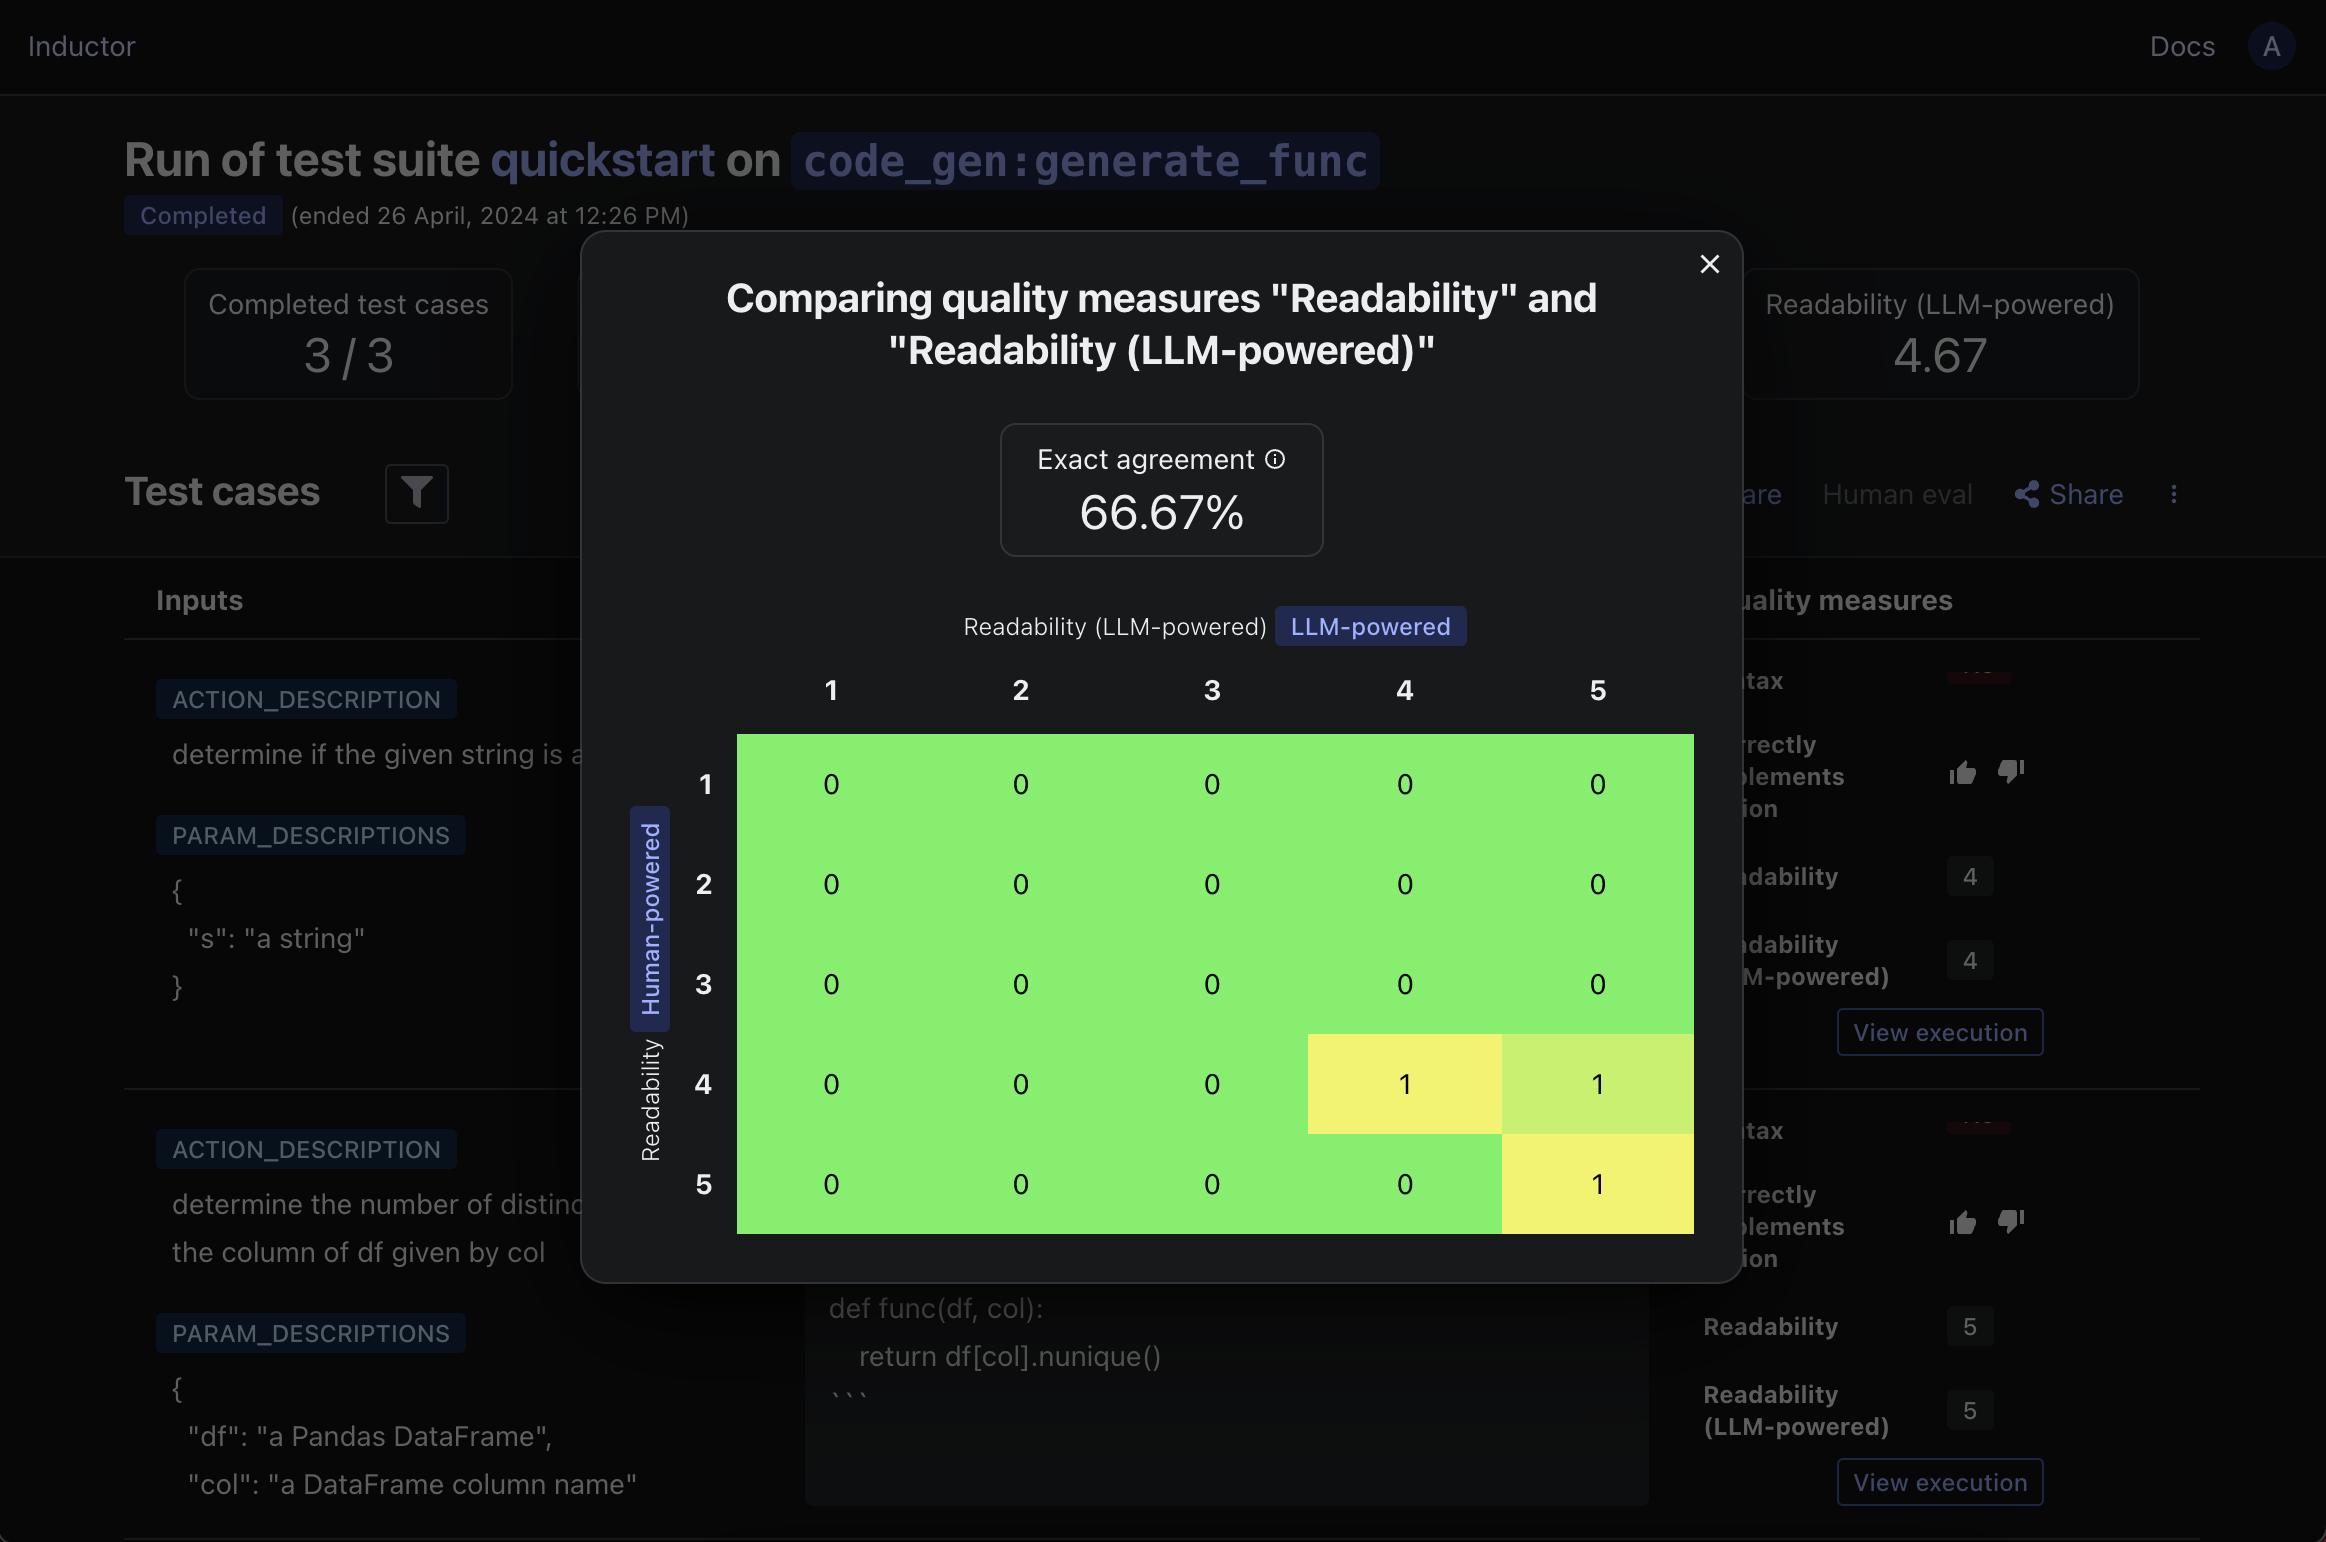
In the web UI for the test suite run, click “Compare”, then select “Two different quality measures” (under “What to compare”). Then, select your LLM-powered quality measure in the lefthand menu (e.g., “Readability” in our walkthrough) and your human-powered quality measure in the righthand menu (e.g., “Readability (LLM-powered)” in our walkthrough), and click “View comparison.”
Inductor will then compute and display the percentage of test cases for which your corresponding LLM-powered and human-powered quality measures exactly agreed, as well as a confusion matrix providing more granular insight into the extent to which they are aligned. For example, in the case of our walkthrough:
If your LLM-powered and human-powered quality measures are sufficiently aligned for your needs, then you can confidently proceed to use your LLM-powered quality measure to automate and scale your human evaluations. If they are not sufficiently aligned, then Inductor provides an easy, efficient workflow for refining your LLM-powered quality measure to bring it into alignment with your human evaluations (see the next section below).
Construct an LLM-powered quality measure to rigorously automate an existing human-powered quality measure#
As noted above, LLM-powered quality measures can be useful for automating and scaling evaluations that would otherwise require human inspection (i.e., evaluations that would otherwise be conducted via human-powered quality measures). The key challenge in using LLMs to automate human evaluations is ensuring that your LLM-based evaluations are sufficiently aligned with your human definitions of quality.
Inductor enables you to solve this problem by providing a systematic workflow for efficiently constructing an LLM-powered quality measure that aligns with – and hence can be trusted to automate – an existing human-powered quality measure.
Note
We explain this workflow below in the setting in which you have an existing human-powered quality measure and seek to construct a new LLM-powered quality measure to rigorously automate it. However, as noted in the “Tip” at the bottom of this section, you can also use the same workflow to improve the degree of alignment of an existing LLM-powered quality measure with a corresponding human-powered quality measure.
Suppose that you have an existing test suite containing a human-powered quality measure, such as the human-powered “Readability” quality measure that we defined above. In order to create a new LLM-powered quality measure to rigorously automate your human-powered quality measure:
Run your test suite (which should already include your human-powered quality measure). For example, in the case of our walkthrough:
Run the test suite defined in the Add quality measures to your test suite section above.
In the web UI for the test suite run, manually evaluate your human-powered quality measure on your test cases; feel free to do so for even a relatively small number of test cases, as this is still typically informative. In the case of our walkthrough:
Manually evaluate the “Readability” quality measure on your test cases.
In the web UI for the test suite run, click on the icon containing three vertical dots on the righthand side, and click on “Create meta test suite”.
Select the name of your human-powered quality measure as the “Target quality measure”, then click on “Get CLI command”. In the case of our walkthrough:
Select “Readability”, then click on “Get CLI command”.
Copy and run the displayed CLI command in your terminal, and answer the CLI’s prompts as needed. For example, in the case of our walkthrough:
Accept the default meta test suite name:
readability_meta_test_suiteAccept the default test suite file path:
meta_test_suite.yamlEnter
code_gen_quality_llm:readabilityas the LLM program FQN (fully qualified name).Finally, press enter to “Create meta test suite file and LLM program file, and write contents.”
This CLI command will generate two things:
A Python file containing a stub for your new LLM-powered quality measure.
In the case of our walkthrough, this stub will be a function named
readabilityin a newly created file namedcode_gen_quality_llm.py.
A “meta” test suite, which you will use to meta-evaluate your new LLM-powered quality measure as you refine it.
In the case of our walkthrough, your new “meta” test suite will be created in a file named
meta_test_suite.yaml.
Note
An LLM-powered quality measure is itself an LLM program that happens to take as its input another LLM program’s output, and in turn returns an evaluation of that other LLM program’s output.
In turn, an Inductor “meta” test suite is a test suite used to “meta”-evaluate an LLM program representing an LLM-powered quality measure, generally by comparing the values that the LLM-powered quality measure returns to target values obtained from a corresponding human-powered quality measure (e.g., in the case of our walkthrough, in order to construct an LLM-powered readability quality measure that aligns with our human-powered readability quality measure).
An Inductor “meta” test suite contains one test case for each test case in the original test suite for your original LLM program (i.e., in the test suite that you ran in step (1) above).
Each “meta” test case’s input (which will be an input used to test your LLM-powered quality measure) is the output of your original LLM program within your original test suite run
Each “meta” test case’s target output value is the value of your human-powered quality measure for the corresponding test case within your original test suite run.
“Meta” test suites generated by Inductor (per the instructions above) also automatically contain “meta” quality measures that determine the degree of agreement between your “meta” test cases’ target output values and the values produced by your LLM-powered quality measure.
Next, populate the Python file containing the stub for your new LLM-powered quality measure with an initial version of your LLM-powered quality measure. For example, in the case of our walkthrough, if you are using the OpenAI API, you can paste the following code into the code_gen_quality_llm.py file:
import openai
import textwrap
from typing import Any, Dict

openai_client = openai.OpenAI(api_key=<ADD YOUR OPENAI API KEY HERE>)

def readability(
    llm_program_output: str, llm_program_inputs: Dict[str, Any]) -> str:
    """Evaluates the quality of an LLM program's output.

    Args:
        llm_program_output: Output of the LLM program.
        llm_program_inputs: Inputs to the LLM program.

    Returns:
        The value produced by this LLM-powered quality measure.
    """
    prompt = textwrap.dedent(f"""
        What is the level of readability of the following code?

        {llm_program_output}

        Note that the above code is intended to
        {llm_program_inputs["action_description"]}.

        Rate readability on a scale of 1 through 5, where 1 means
        that the code's readability can easily be improved (e.g., by adding
        comments or changing spacing), and 5 means that the code above is
        already highly readable (e.g., it is well-structured and appropriately
        commented, with concise though informative names).
    """.strip())

    chat_completion = openai_client.chat.completions.create(
        messages=[{"role": "system", "content": prompt}],
        model="gpt-3.5-turbo")

    # Return
    return chat_completion.choices[0].message.content
Note
You can implement the body of your LLM-powered quality measure using any LLM or LLM provider, as well as any additional Python logic, that you’d like (e.g., you can use a non-OpenAI LLM, or do more complex processing, such as multiple LLM calls).
The only requirement of your LLM-powered quality measure function’s behavior is that its return value adheres to your quality measure’s
evaluation_type, as follows:If
evaluation_typeis BINARY, then must return of the strings “YES”, “Y”, “TRUE”, “NO”, “N”, or “FALSE” (all treated case-insensitively), or a Python boolean value (i.e.,TrueorFalse).If
evaluation_typeis RATING_INT, then must return one of the strings “1”, “2”, “3”, “4”, or “5”, or one of the integers 1, 2, 3, 4, or 5.
After populating your LLM-powered quality measure’s code, you can meta-evaluate your LLM-powered quality measure by running your new meta test suite as you would any other test suite. For example, in the case of our walkthrough, you would run the following CLI command:
$ inductor test meta_test_suite.yaml
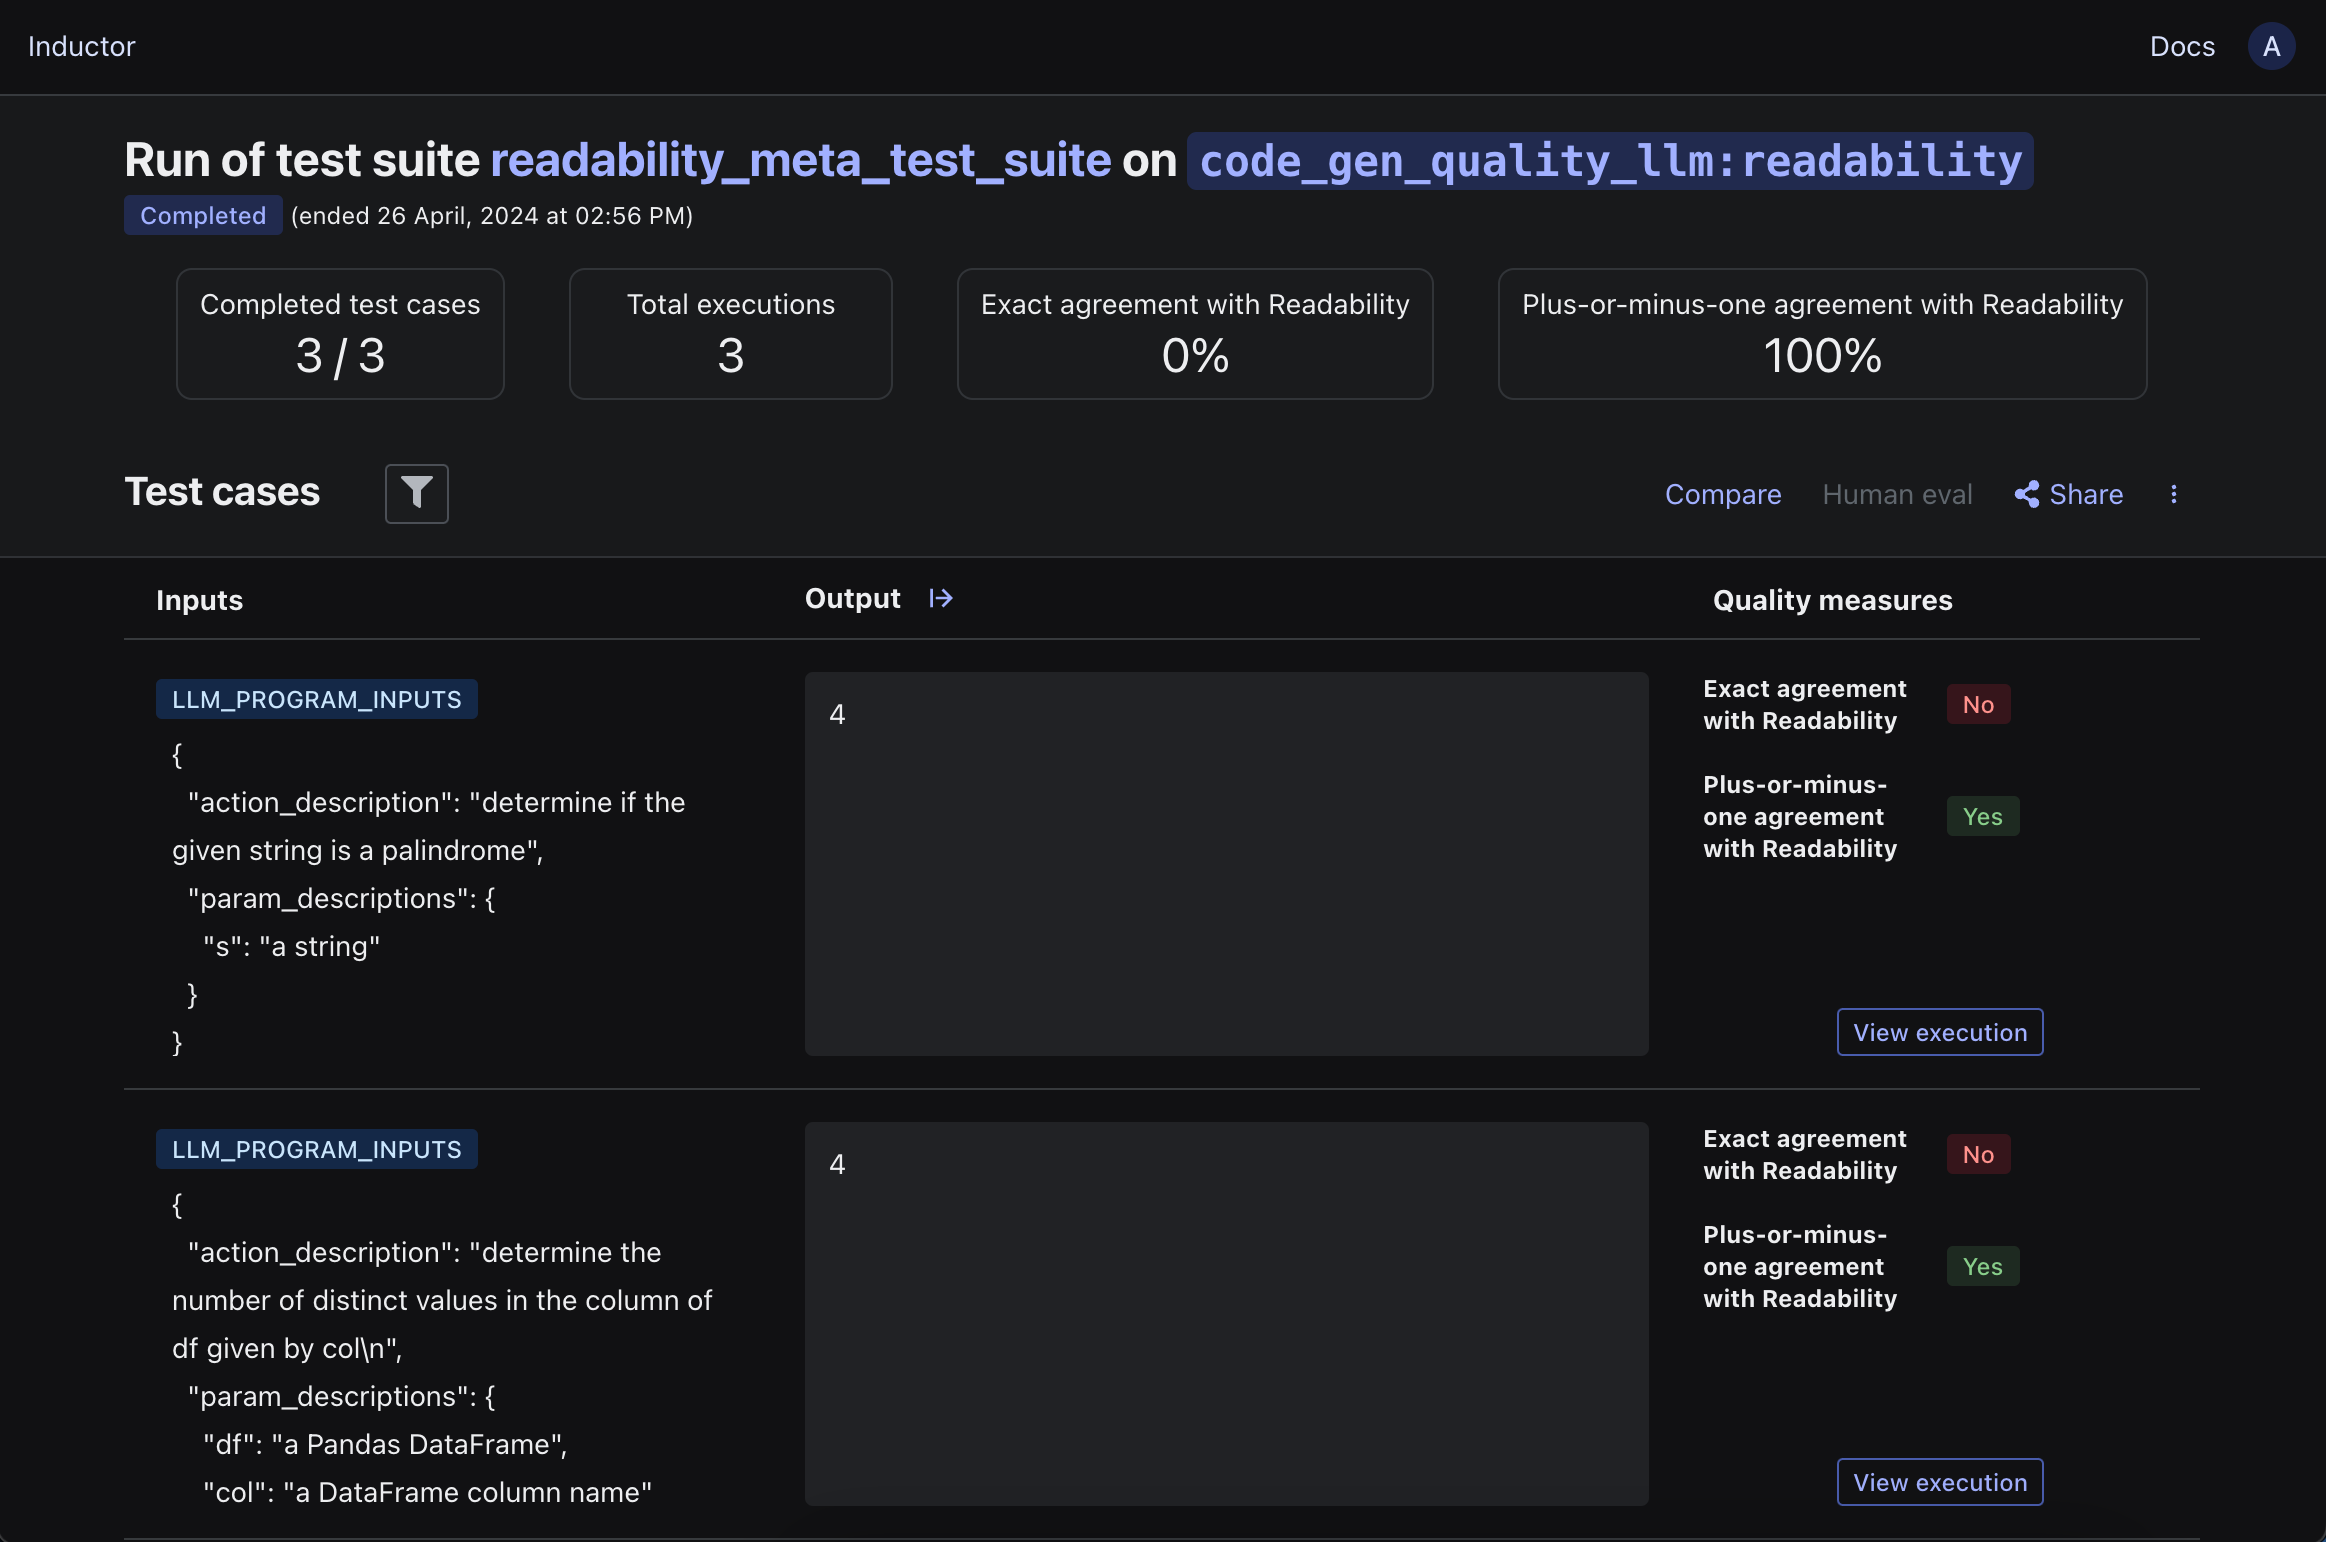
Doing so will quantify your LLM-powered quality measure’s level of agreement with the human-powered quality measure that you specified when you created the meta test suite. For example, in the case of our walkthrough:
If the level of agreement is lower than needed for your use case, you can then iterate on your LLM-powered quality measure to bring it into closer alignment with your human-powered quality measure, by modifying your LLM-powered quality measure and rerunning your meta test suite (i.e., by rerunning the CLI command inductor test meta_test_suite.yaml in the case of our walkthrough). That is, this workflow enables you to iterate on (and refine) your LLM-powered quality measure in the same way in which you would iterate on any other LLM program (e.g., you can experiment with different prompts or models, you can use Inductor hyperparameters to turbocharge your experimentation).
When your LLM-powered quality measure’s level of agreement with your previously-defined human-powered quality measure is sufficiently high, simply add your newly refined LLM-powered quality measure to your original test suite (i.e., the test suite for your original LLM program). For example, in the case of our walkthrough, you would add the following to your original test suite file (i.e., either test_suite.yaml or test_suite.py):
- quality:
    name: Readability (LLM-powered)
    evaluator: LLM
    evaluation_type: RATING_INT
    spec: code_gen_quality_llm:readability
import code_gen_quality_llm

test_suite.add(
    inductor.QualityMeasure(
        name="Readability (LLM-powered)",
        evaluator="LLM",
        evaluation_type="RATING_INT",
        spec=code_gen_quality_llm.readability))
Thereafter, as you iterate on your original LLM program and (re)run your original test suite, your new LLM-powered quality measure will automatically run and thereby serve to automate the evaluations previously performed via your human-powered quality measure.
Tip
This section has described how to create an entirely new LLM-powered quality measure to automate an existing human-powered quality measure. If you already have an existing LLM-powered quality measure that you created as described in the Add an LLM-powered quality measure to your test suite section above, and you would like to refine it in order to bring it into better alignment with a human-powered quality measure, then Inductor enables you to use a similar workflow to do so.
In this setting, in step (4) above (in which you use the Inductor web UI to get the CLI command to create your meta test suite), select an existing “LLM-powered quality measure to align with target.” When you run the resulting CLI command, Inductor will then prepopulate the LLM program representing your LLM-powered quality measure based on your existing LLM-powered quality measure.
Log intermediate values#
In order to better observe and understand the behavior of your LLM program, Inductor makes it easy to log any value produced during its execution.
To do so, simply import inductor and add one or more inductor.log() calls to your LLM program’s code.
For instance, in our example LLM program for this walkthrough, we can log each execution’s fully-constructed prompt in order to see exactly what the model sees, as well as to detect and debug any issues in our prompt construction:
import inductor
import openai
from typing import Dict

openai_client = openai.OpenAI(api_key=<ADD YOUR OPENAI API KEY HERE>)

def generate_func(
    param_descriptions: Dict[str, str], action_description: str) -> str:

    # Construct prompt
    prompt = ("Write a Python function named `func` that takes the following "
              "parameters:\n\n")
    prompt += "\n".join(
        f"- {name}: {desc}" for name, desc in param_descriptions.items())
    prompt += "\n\n"
    prompt += f"The function should {action_description}."
    inductor.log(prompt, name="Fully constructed prompt")

    # Generate function
    chat_completion = openai_client.chat.completions.create(
        messages=[{"role": "system", "content": prompt}],
        model="gpt-3.5-turbo")

    # Return
    return chat_completion.choices[0].message.content
Note
inductor.logcan be used to log any JSON-serializable value (i.e., strings, numbers, booleans, None, dicts, lists, or nested structures of any of the preceding).The
nameargument is optional.
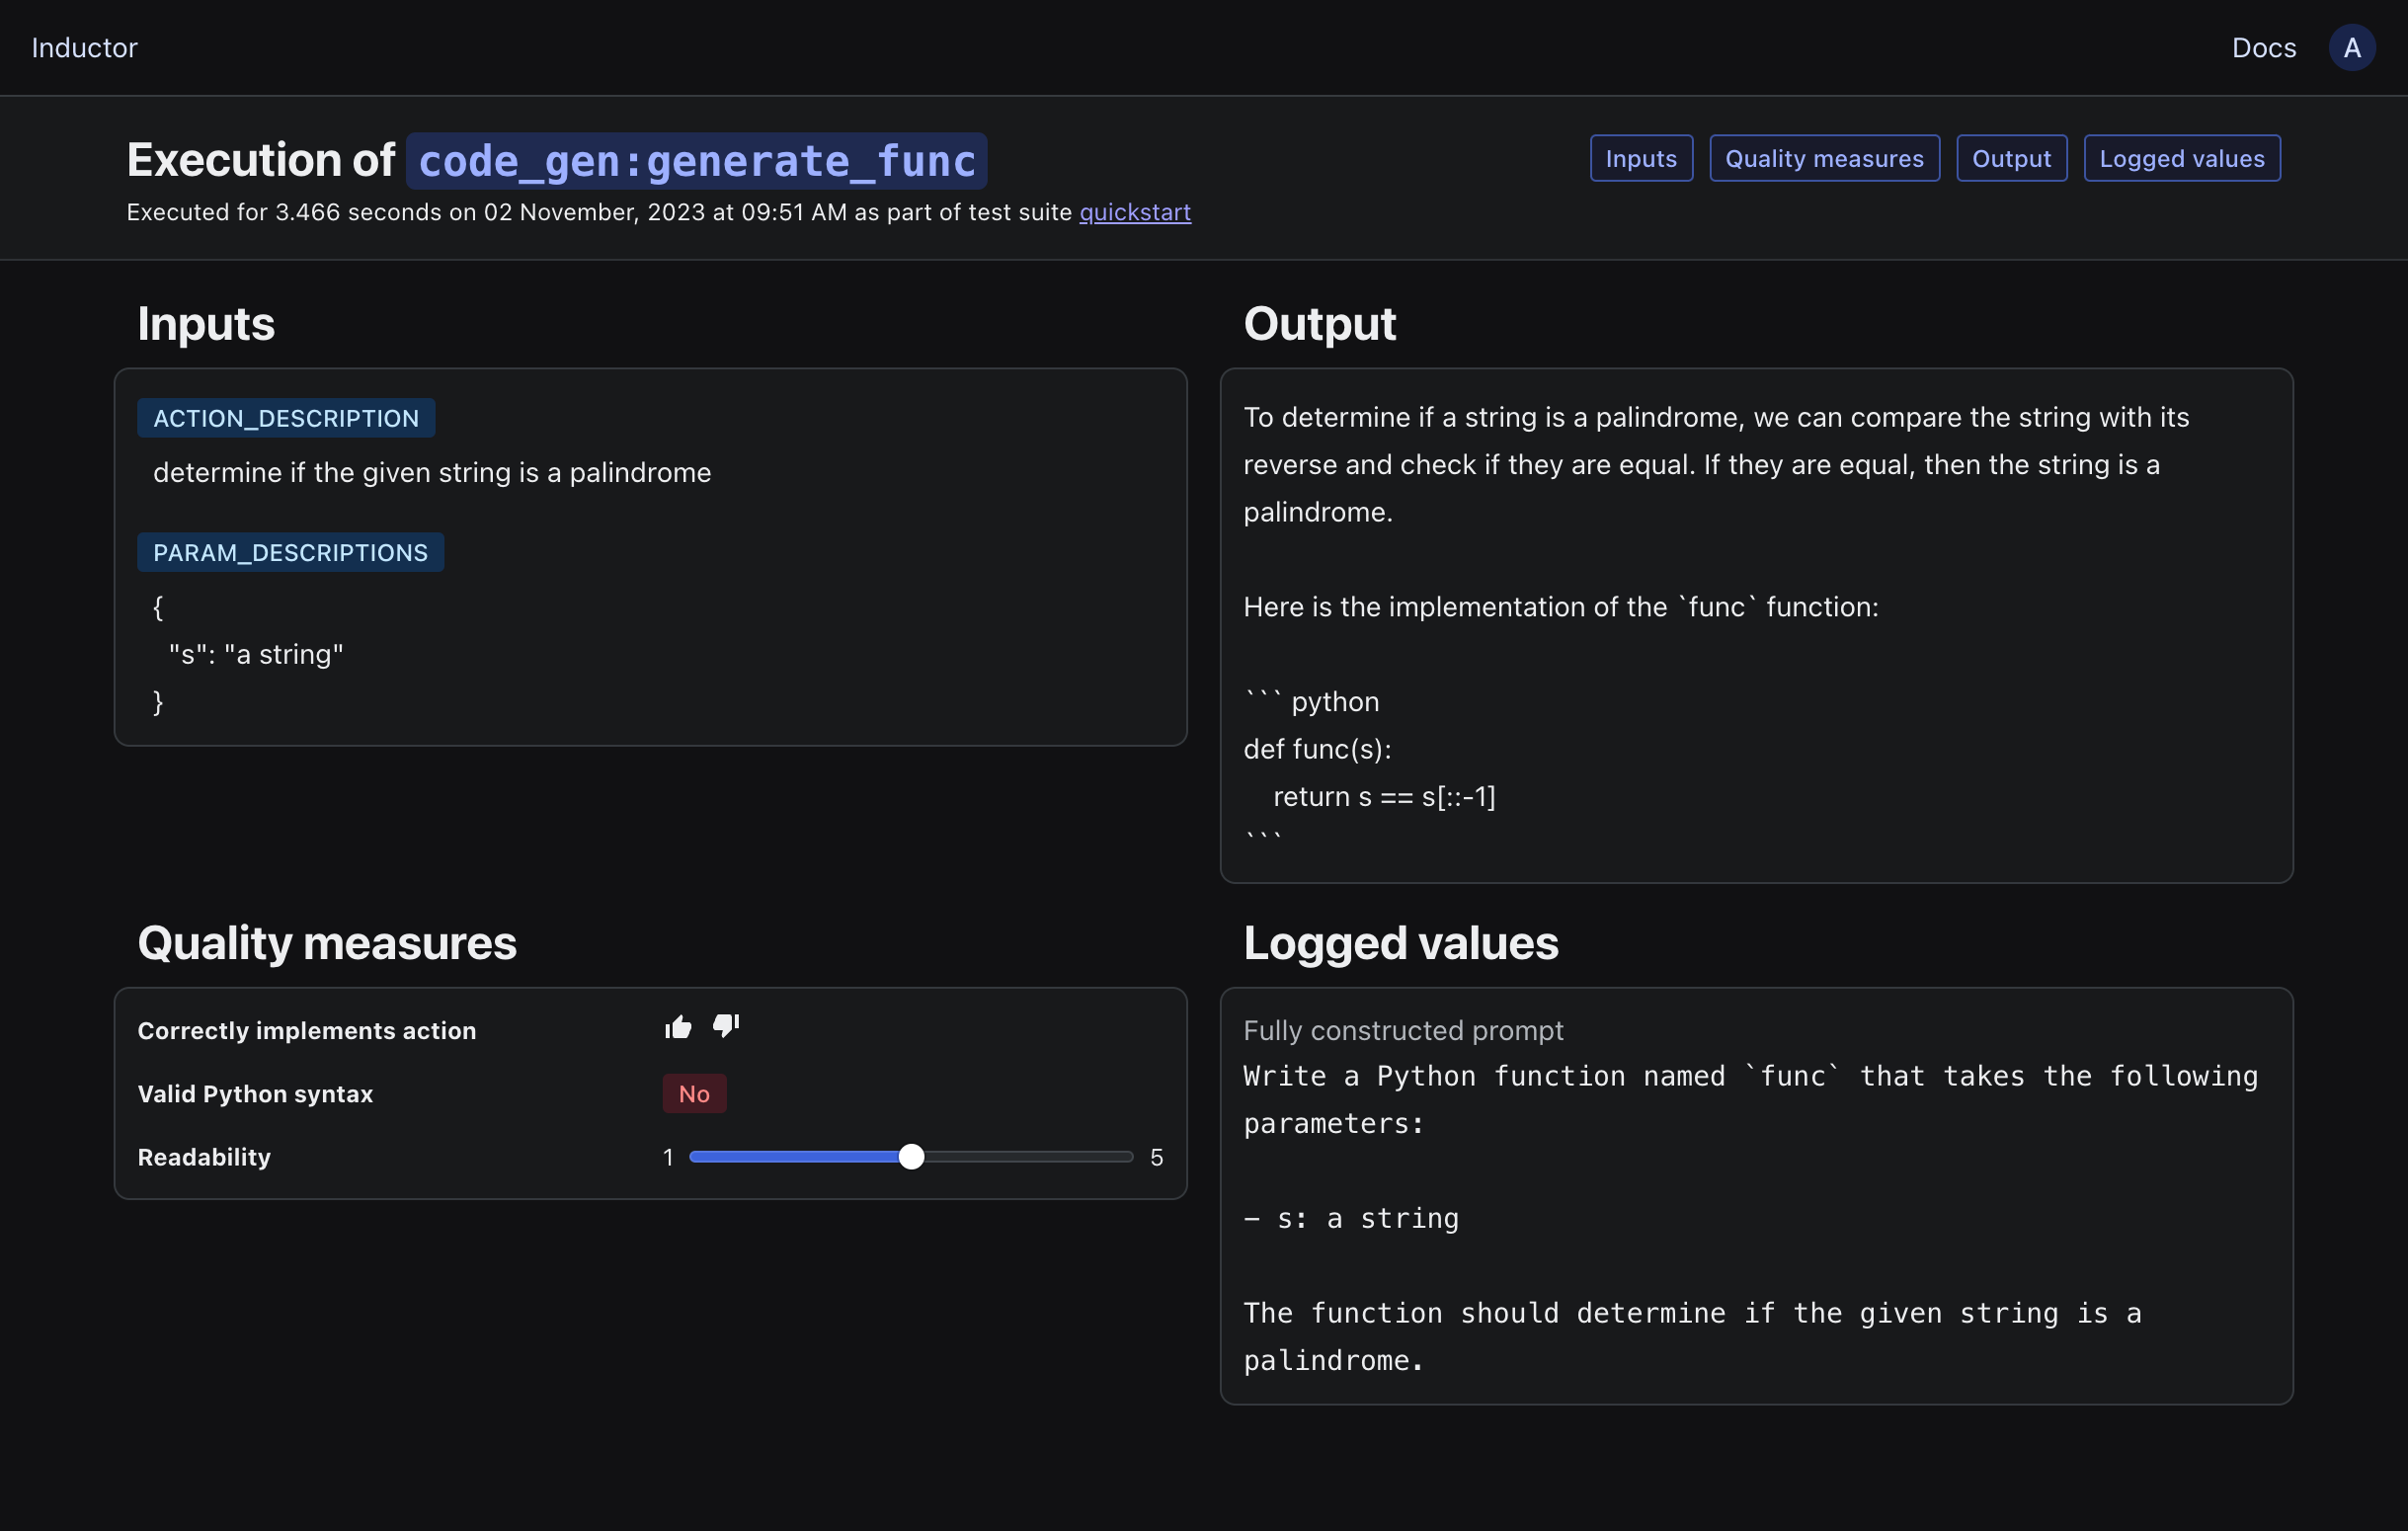
To view the logged values for an LLM program execution, run your test suite (via inductor test test_suite.yaml if using YAML and CLI, or python test_suite.py if using the Python API), open the displayed link, and then click on the “View execution” button within any test case’s row. You will then see a view like the following:
Tip
In the view above, you can click on the chips in the upper-right of the screen (“Inputs”, “Quality measures”, etc), or press their lower-cased first initials on your keyboard (“i”, “q”, etc), in order to show or hide the corresponding cards.
Iteratively improve your LLM program#
Developing a production-ready LLM application generally requires significant iteration in order to achieve the quality, cost-effectiveness, and safety necessary to ship, and then continuously improve. Inductor makes it dramatically easier and faster to do this, by enabling you to systematically make targeted improvements to your LLM program and measure their outcomes.
For example, as we saw above, our example LLM program currently does not reliably output valid Python code; for instance, it sometimes includes explanatory text in addition to the generated function. Having understood this fact via our prior test suite runs, we can now make targeted improvements to our LLM program to induce it to more reliably output only valid Python.
There are a variety of possible modifications that we might consider, such as changing the instructions provided to the model in the prompt, adding examples of valid outputs to the prompt, changing the model used to generate the output, and more. For any such change to our LLM program, it is essential to measure its impact (in this case, on our LLM program’s code generation reliability) in order to determine whether or not (and how much) we are actually improving our LLM program. This enables us to improve systematically, detect regressions, and determine if additional modifications are required to achieve our goals.
For this walkthrough, we will add instructions to the prompt to further encourage the desired behavior, as follows:
import inductor
import openai
from typing import Dict

openai_client = openai.OpenAI(api_key=<ADD YOUR OPENAI API KEY HERE>)

def generate_func(
    param_descriptions: Dict[str, str], action_description: str) -> str:

    # Construct prompt
    prompt = ("Write a Python function named `func` that takes the following "
              "parameters:\n\n")
    prompt += "\n".join(
        f"- {name}: {desc}" for name, desc in param_descriptions.items())
    prompt += "\n\n"
    prompt += f"The function should {action_description}.  "
    prompt += (
        "You must output **only** valid Python code.  "
        "Do not include any additional explanation outside of the generated function.  "
        "Do **not** include ```python or ``` before or after the generated function.")
    inductor.log(prompt, name="Fully constructed prompt")

    # Generate function
    chat_completion = openai_client.chat.completions.create(
        messages=[{"role": "system", "content": prompt}],
        model="gpt-3.5-turbo")

    # Return
    return chat_completion.choices[0].message.content
Rerun your test suite (via inductor test test_suite.yaml if using YAML and CLI, or python test_suite.py if using the Python API) and open the link that is printed in your terminal:

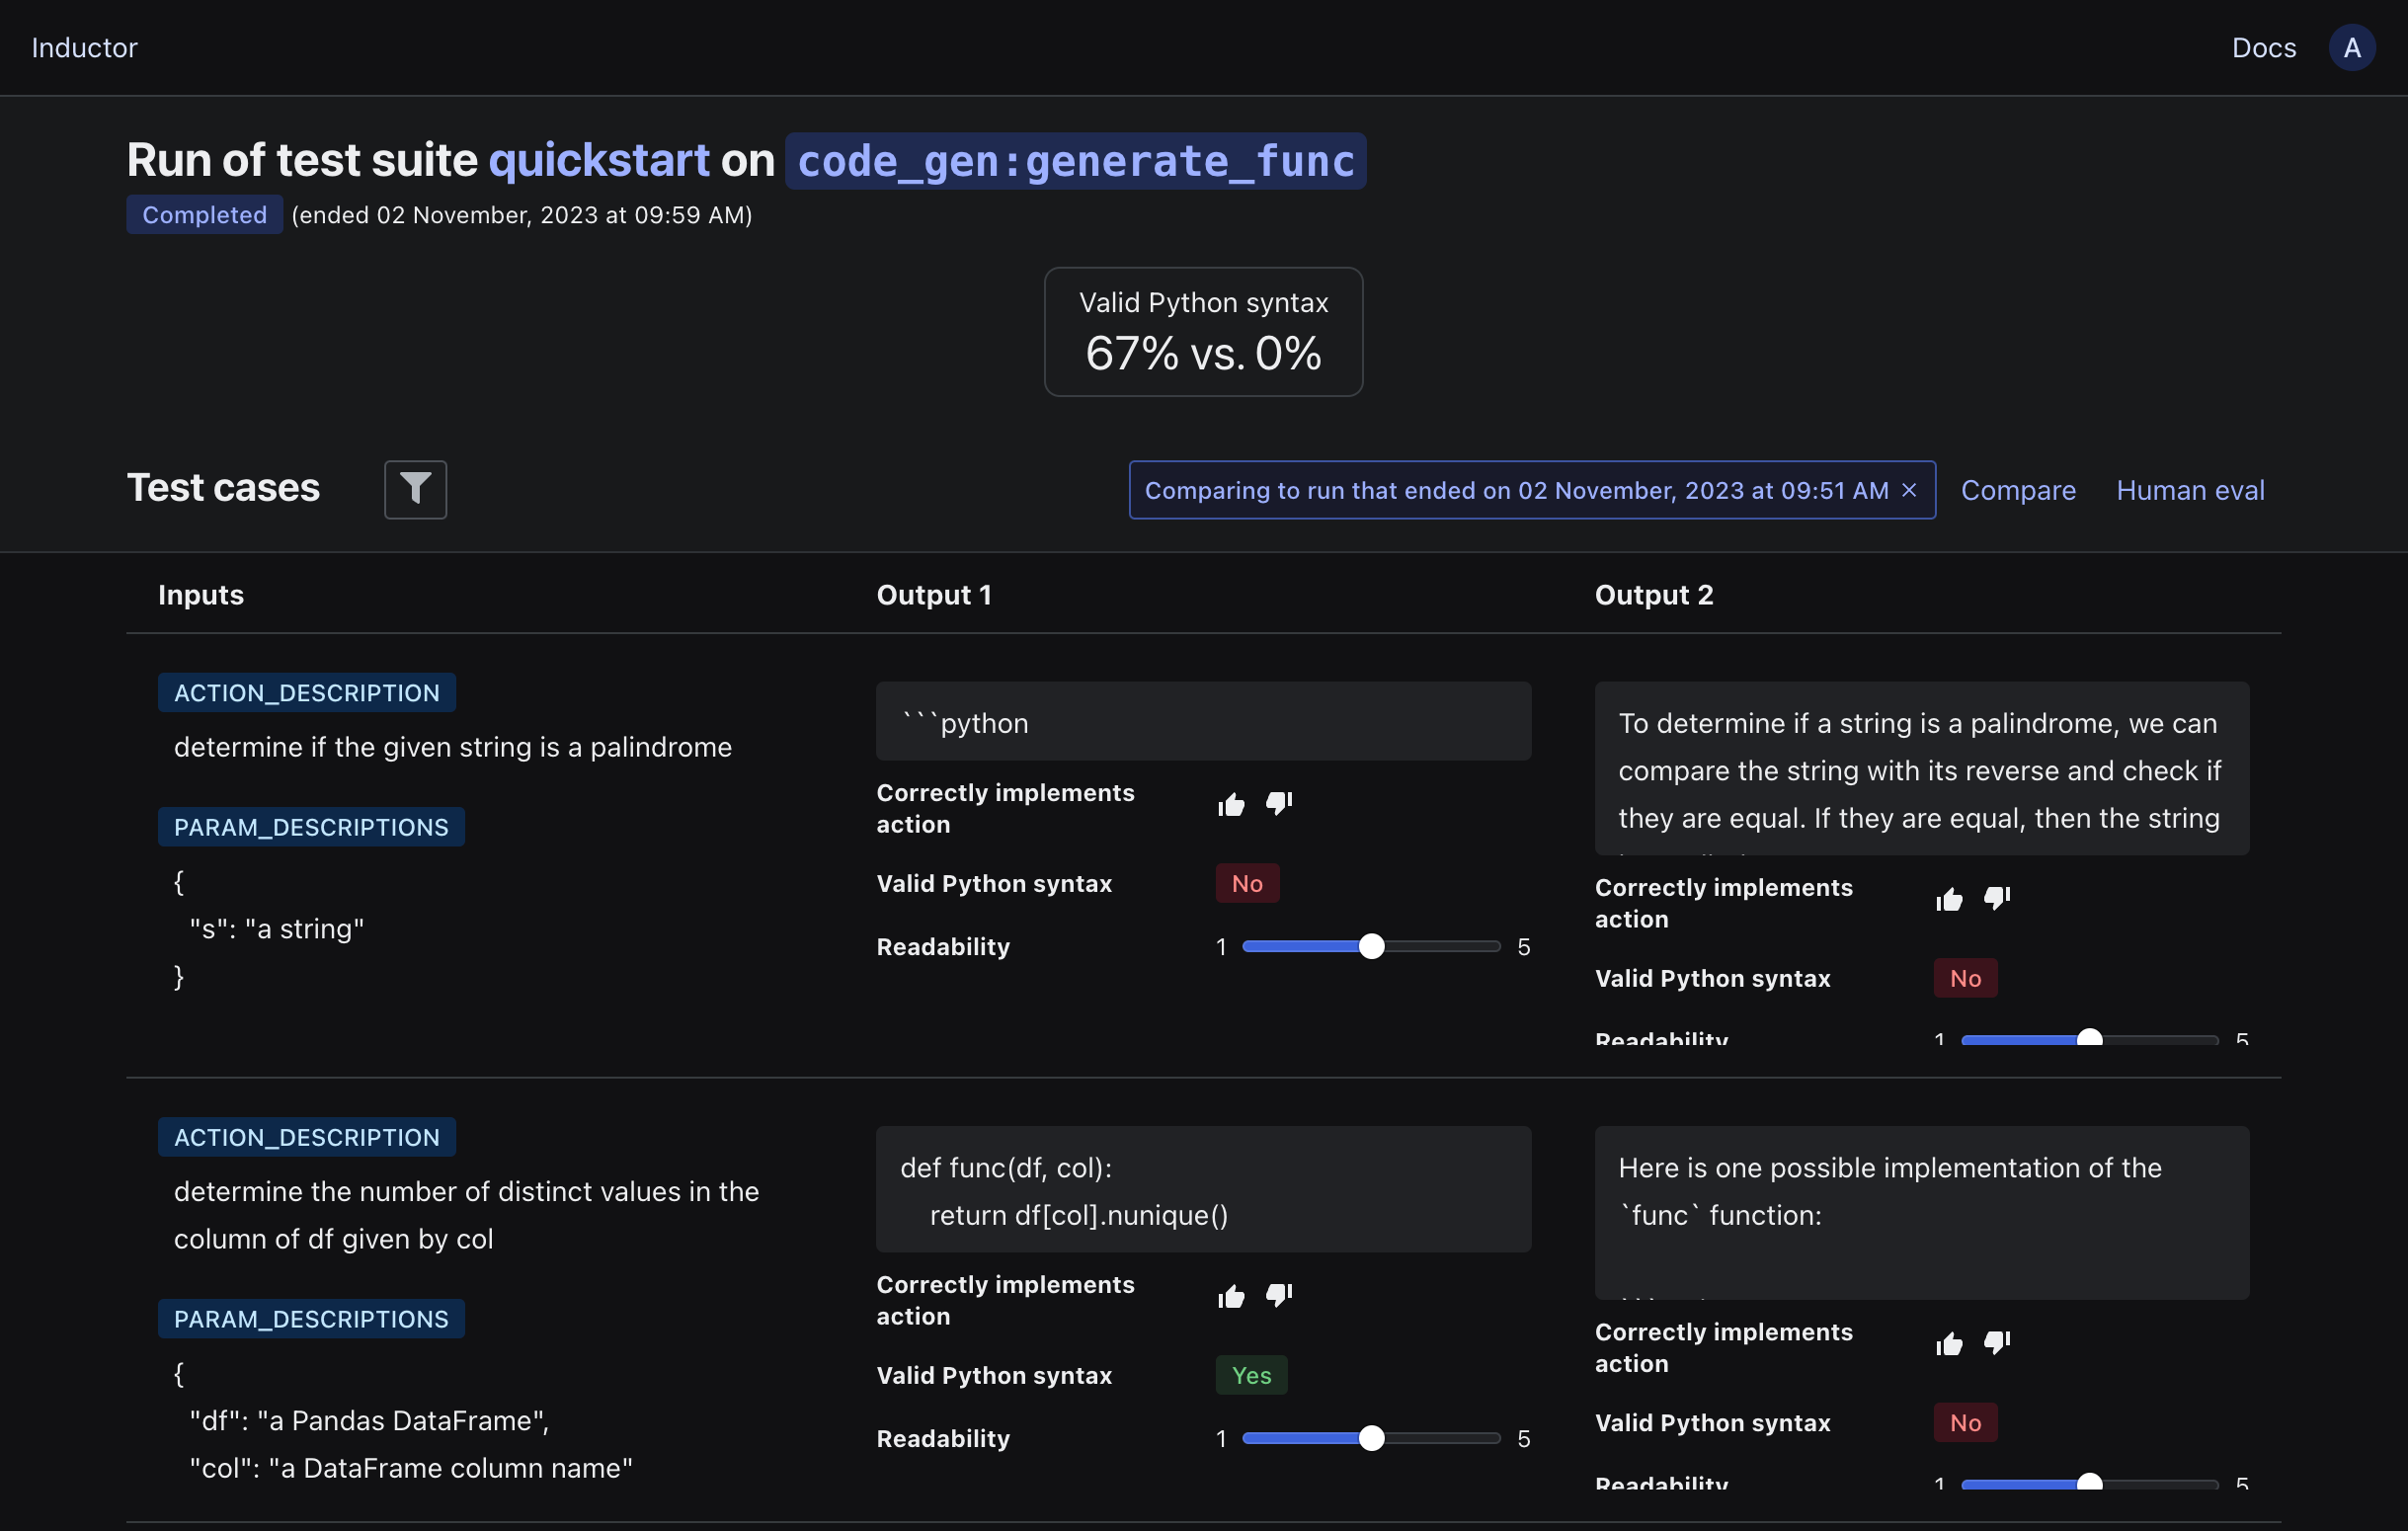
We can also compare the outputs of the new version of our LLM program to the outputs of the previous version on each test case by clicking the “Compare” button, selecting “To another run” in the “What to compare” dropdown, selecting the most recent prior run in the “Test suite run” dropdown, and clicking “View comparison”:
Tip
When running a test suite, you can use the Inductor CLI’s --replicas flag to automatically execute your LLM program multiple times for each test case and unique set of hyperparameter values, in order to understand the variability of your LLM program’s outputs given the same inputs. For example:
$ inductor test test_suite.yaml --replicas=3
Tip
When running a test suite, you can use the TestSuite run() method’s replicas parameter to automatically execute your LLM program multiple times for each test case and unique set of hyperparameter values, in order to understand the variability of your LLM program’s outputs given the same inputs. For example:
test_suite.run(replicas=3)
Use hyperparameters to turbocharge your iteration#
In order to improve an LLM program, there are typically a multitude of different modifications or enhancements that one can consider. For example, one might modify the content of the prompt, the way in which the prompt is constructed, the model utilized, the settings (e.g., temperature) used to run the model, the way in which retrieval augmentation is performed, and more.
Inductor’s hyperparameters enable you to automatically screen across different variants of your LLM program to assess their quality and cost-effectiveness – thereby enabling you to experiment and improve dramatically faster, while remaining rigorous and organized by default.
Tip
In addition to running experiments to improve output quality, you can also use hyperparameters to reduce cost – for example, by determining if you can use a less expensive model while still attaining the requisite quality for your application.
In particular, Inductor’s hyperparameters are mappings from string-valued names to arbitrary values. Inductor makes it easy to define the different values that a hyperparameter can take as part of a test suite, and then inject those values into your LLM program; Inductor automatically handles executing your LLM program on all distinct hyperparameter values (or combinations of values if using multiple hyperparameters) specified in your test suite.
For example, to determine if changing the model used by our LLM program from gpt-3.5-turbo to gpt-4 would improve its outputs, we can use a hyperparameter. To do so, we add a hyperparameter specification to our test suite file (test_suite.yaml) as follows:
- hparam:
    name: model
    type: SHORT_STRING
    values: ["gpt-3.5-turbo", "gpt-4"]
For example, to determine if changing the model used by our LLM program from gpt-3.5-turbo to gpt-4 would improve its outputs, we can use a hyperparameter. To do so, we add a hyperparameter specification to our test suite file (test_suite.py) above the test_suite.run() call as follows:
test_suite.add(
    inductor.HparamSpec(
        name="model",
        type="SHORT_STRING",
        values=["gpt-3.5-turbo", "gpt-4"]))
Note
The value of the
namefield above is arbitrary; when adding a hyperparameter, feel free to specify a name that reflects your hyperparameter’s semantics.The value of the
typefield can be “SHORT_STRING”, “TEXT”, or “NUMBER” (the distinction between “SHORT_STRING” and “TEXT” is only in how the hyperparameter’s values will be displayed in the UI).
Tip
While the example hyperparameter above screens across different models, you can use hyperparameters to test variants of any facet of your LLM program, such as prompts, retrieval augementation strategies, or pre- or post-processing approaches.
Then, add a call (or multiple calls) to inductor.hparam() in your LLM program’s code to retrieve and utilize the hyperparameter’s value wherever and however you’d like. For instance:
import inductor
import openai
from typing import Dict

openai_client = openai.OpenAI(api_key=<ADD YOUR OPENAI API KEY HERE>)

def generate_func(
    param_descriptions: Dict[str, str], action_description: str) -> str:

    # Construct prompt
    prompt = ("Write a Python function named `func` that takes the following "
              "parameters:\n\n")
    prompt += "\n".join(
        f"- {name}: {desc}" for name, desc in param_descriptions.items())
    prompt += "\n\n"
    prompt += f"The function should {action_description}.  "
    prompt += (
        "You must output **only** valid Python code.  "
        "Do not include any additional explanation outside of the generated function.  "
        "Do **not** include ```python or ``` before or after the generated function.")
    inductor.log(prompt, name="Fully constructed prompt")

    # Generate function
    chat_completion = openai_client.chat.completions.create(
        messages=[{"role": "system", "content": prompt}],
        model=inductor.hparam("model", "gpt-3.5-turbo"))

    # Return
    return chat_completion.choices[0].message.content
Note
inductor.hparam()takes two arguments: the name of the hyperparameter (“model” above), and a default value (“gpt-3.5-turbo” above) to be used for the hyperparameter if no values for the hyperparameter are specified exogenously (i.e., if the LLM program is run outside of a test suite, or within a test suite that does not specify values for the hyperparameter).inductor.hparam()returns the current value of the specified hyperparameter (or the default value if running outside of a test suite, or within a test suite that does not specify values for the hyperparameter).
Rerun your test suite (via inductor test test_suite.yaml if using YAML and CLI, or python test_suite.py if using the Python API) and open the link that is printed in your terminal:

Note that the hyperparameter values used for each execution are displayed above each test case’s input values. In addition to inspecting the LLM program’s outputs in this view, we can more directly compare the outputs and quality of our LLM program across different hyperparameter values by clicking the “Compare” button. In the dialog box that appears, select “Different hyperparameter values” in the “What to compare” dropdown, select “model” in the “Hyperparameter” dropdown, select “gpt-3.5-turbo” and “gpt-4” in the “Select values to compare” dropdowns, and click “View comparison”:
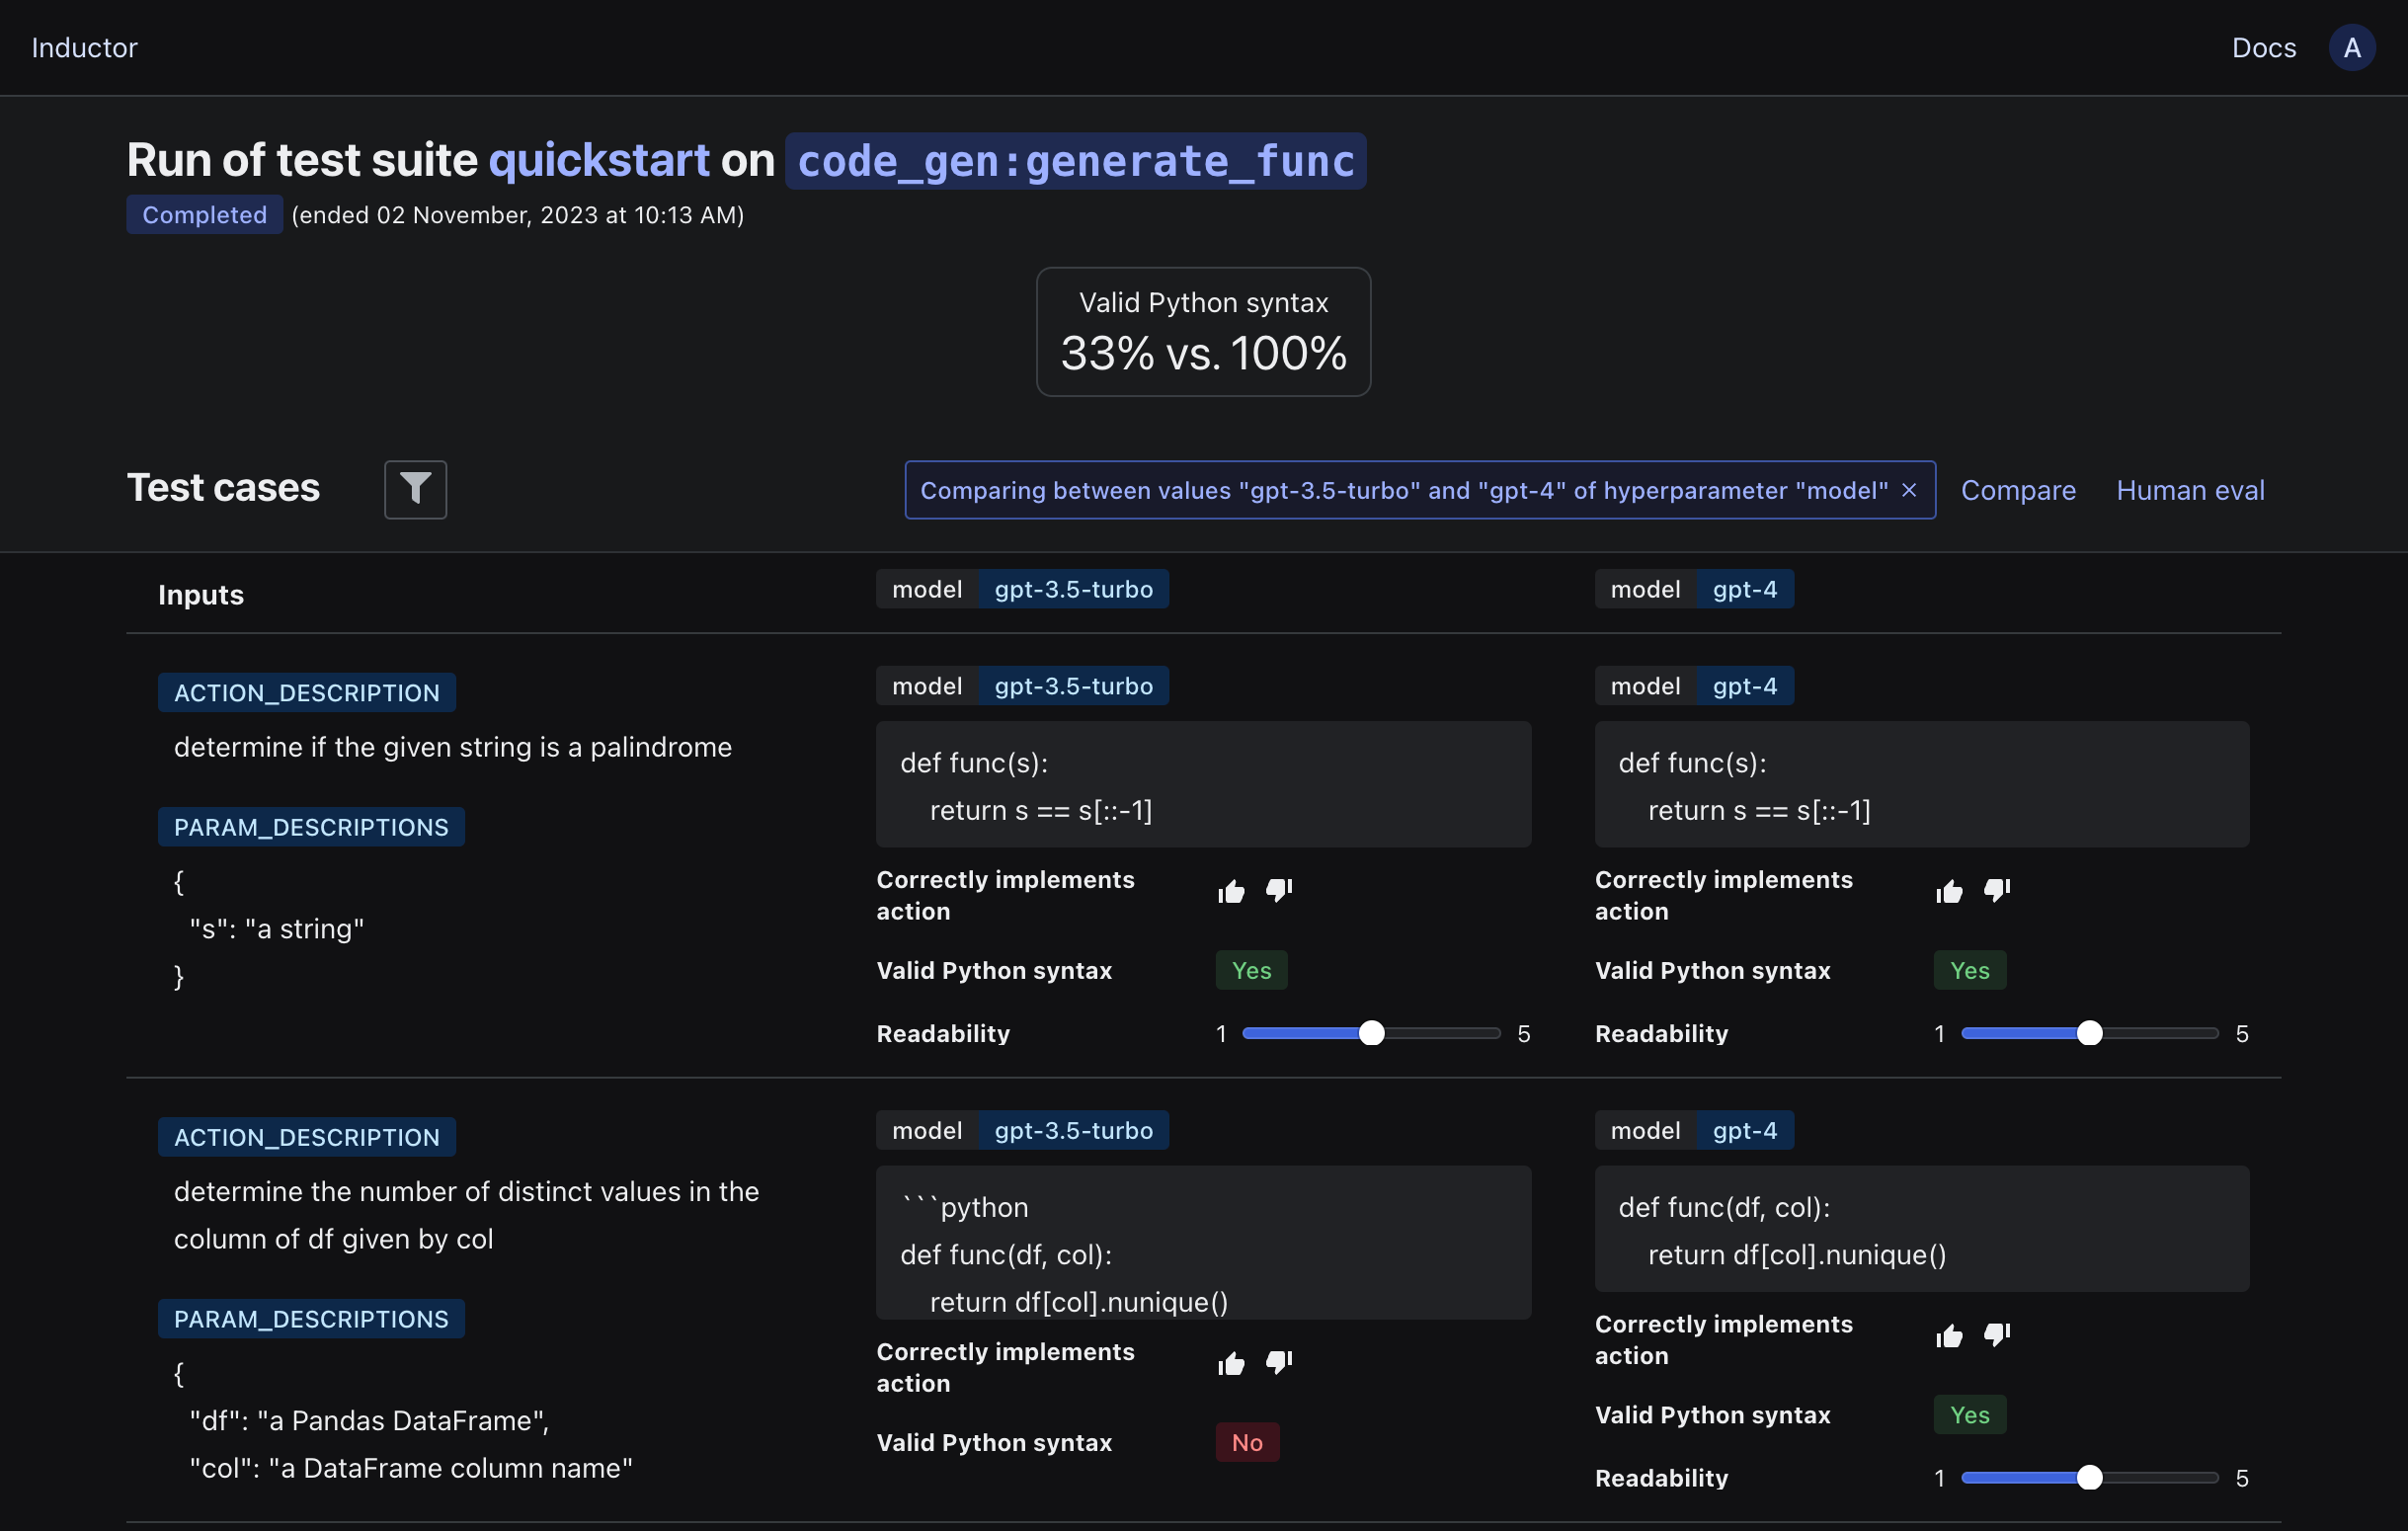
The cards at the top of the resulting view display summaries of the available quality measures for each hyperparameter value’s executions, and the LLM program’s outputs using the two different hyperparameter values are displayed side by side below.
Tip
While our walkthrough above introduced only a single hyperparameter, multiple hyperparameters can be utilized within the same test suite and LLM program to automatically test all combinations of their values (simply add additional hyperparameter specifications to the test suite file, and additional inductor.hparam() calls to the LLM program’s code).
Tip
As you add test cases and hyperparameters to your test suites, you can use the Inductor CLI’s --parallelize flag to accelerate test suite execution by enabling Inductor to perform multiple executions of your LLM program simultaneously (e.g., on different test cases). For example:
$ inductor test test_suite.yaml --parallelize=4
Tip
As you add test cases and hyperparameters to your test suites, you can use the TestSuite run() method’s parallelize parameter to accelerate test suite execution by enabling Inductor to perform multiple executions of your LLM program simultaneously (e.g., on different test cases). For example:
test_suite.run(parallelize=4)
Power your systematic deployment process#
After iterating on your LLM program, you will need to deploy it (e.g., as part of your product). As with any software (and perhaps even more so), creating a systematic deployment process for your LLM program is essential in order to ship rapidly and reliably. In particular, it is critical to ensure that you are able to ship and update your LLM program in production while having confidence that it will behave as intended, and will not experience regressions.
Whether you use an automated CI/CD process or a human deployment gating process (or both), Inductor makes it easy to test and ensure the quality, cost-effectiveness, and safety of your LLM program as part of that process.
If you use an automated CI/CD pipeline, you can utilize Inductor to run one or more test suites as part of your CI/CD process. For example, if you use GitHub actions, you can create a GitHub action step that runs an Inductor test suite as follows:
- name: Run Inductor test suite
  run: |
    python -m pip install --upgrade pip
    pip install inductor
    inductor test path/to/test_suite.yaml
- name: Run Inductor test suite
  run: |
    python -m pip install --upgrade pip
    pip install inductor
    python path/to/test_suite.py
Such a GitHub action step could be used, for example, to automatically run test suites whenever a pull request is created or submitted, or as part of a deployment workflow.
Note
To use Inductor in a GitHub action, you will need to provide it with an Inductor API key. See the note at the end of the following section for instructions on how to do so.
If you use a human deployment review or gating process (e.g., for major releases), Inductor also makes it easy to perform systematic and rigorous human evaluation, and enable all relevant stakeholders to easily review the quality, cost-effectiveness, and safety of the LLM program prior to release.
Monitor your LLM program on live traffic#
When your LLM program is running in production, it is critical to monitor and understand its behavior in order to
ensure that it is behaving as intended,
detect and resolve any issues,
analyze actual usage in order to improve, and
feed issues or insights back into your development process.
Inductor makes the above easy to do by adding a single line to your LLM program’s code. Simply add the decorator @inductor.logger to your LLM program in order to log all of its executions that occur on live traffic (i.e., all executions that do not occur while running a test suite). For example:
import inductor
import openai
from typing import Dict

openai_client = openai.OpenAI(api_key=<ADD YOUR OPENAI API KEY HERE>)

@inductor.logger
def generate_func(
    param_descriptions: Dict[str, str], action_description: str) -> str:

    # Construct prompt
    prompt = ("Write a Python function named `func` that takes the following "
              "parameters:\n\n")
    prompt += "\n".join(
        f"- {name}: {desc}" for name, desc in param_descriptions.items())
    prompt += "\n\n"
    prompt += f"The function should {action_description}.  "
    prompt += (
        "You must output **only** valid Python code.  "
        "Do not include any additional explanation outside of the generated function.  "
        "Do **not** include ```python or ``` before or after the generated function.")
    inductor.log(prompt, name="Fully constructed prompt")

    # Generate function
    chat_completion = openai_client.chat.completions.create(
        messages=[{"role": "system", "content": prompt}],
        model=inductor.hparam("model", "gpt-3.5-turbo"))

    # Return
    return chat_completion.choices[0].message.content
To emulate live traffic flowing to your LLM program, open a Python interpreter (i.e., run python in your terminal), import your LLM program (i.e., run from code_gen import generate_func), and run generate_func a few times. For example:
generate_func({"s": "a string"}, "reverse the given string")
Then, open Inductor in your browser (https://app.inductor.ai), scroll down to the “LLM programs” section, and click on the “View live executions” button for your LLM program (code_gen:generate_func) to view its executions on live traffic:
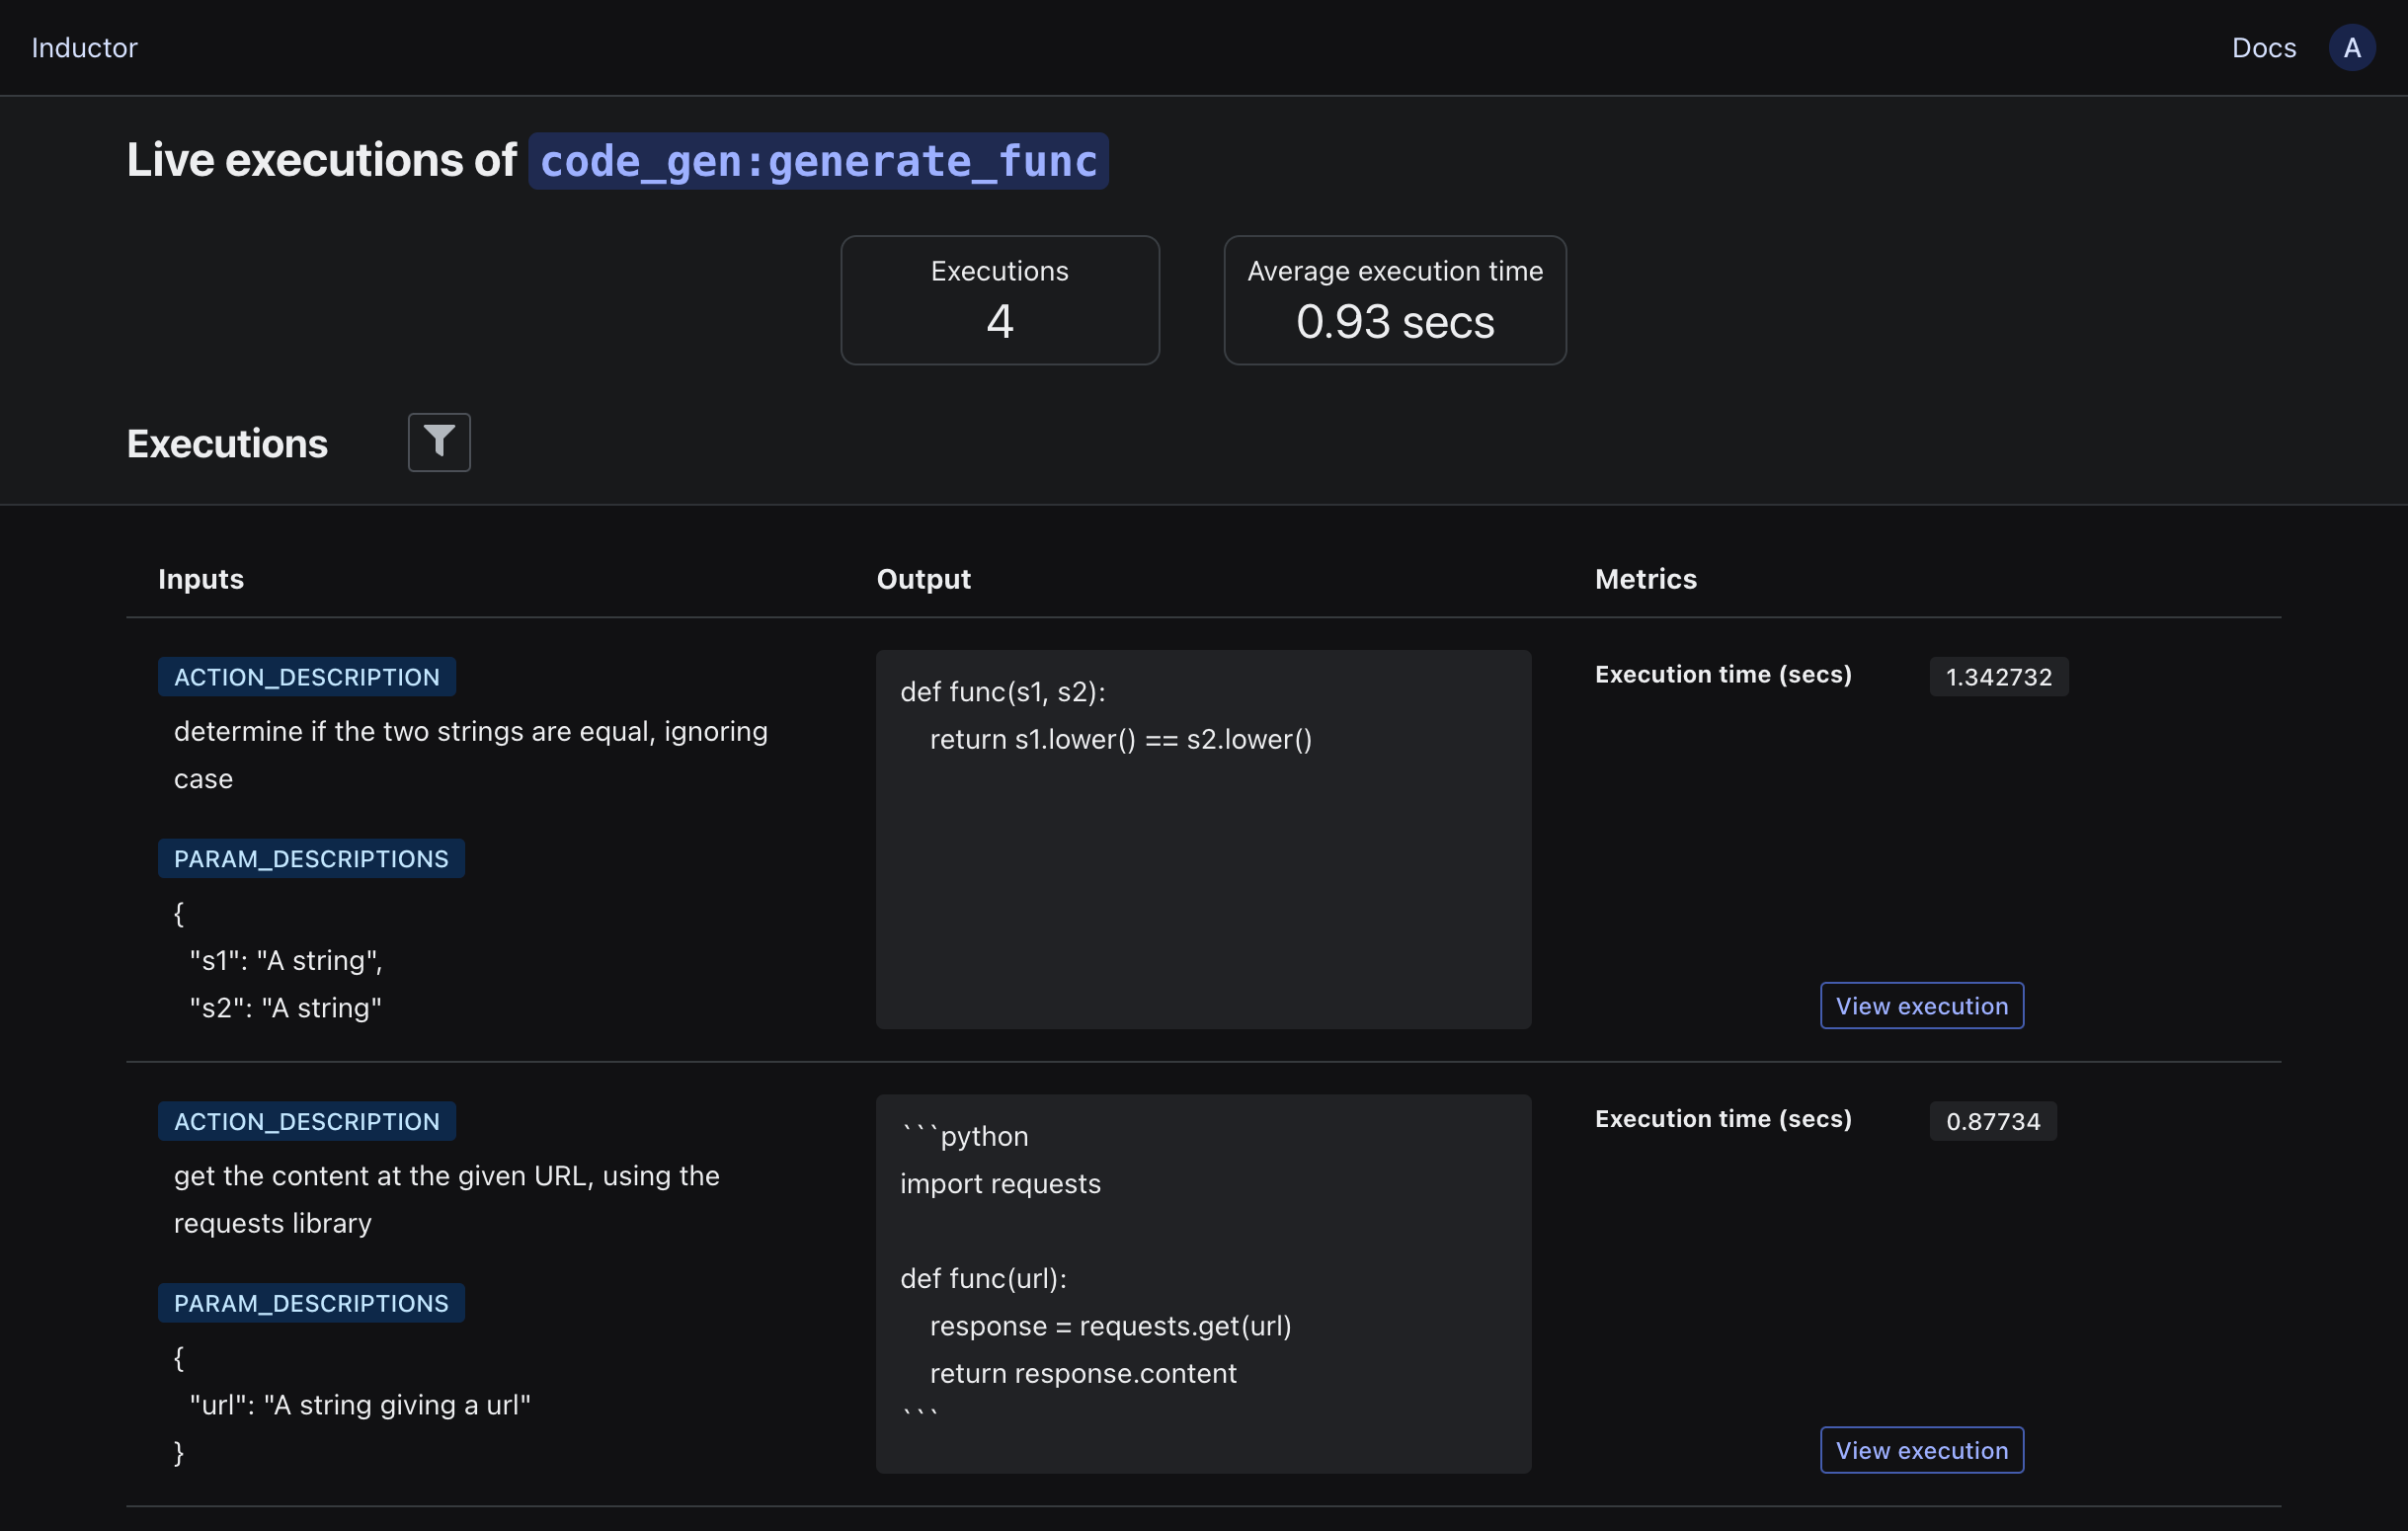
You can then review live executions of your LLM program as they occur, filter them to investigate and identify subsets of interest, and view the details of any individual execution (including any logged intermediate values) by clicking on the “View execution” button.
Note
In the walkthrough above, our LLM program is already able to authenticate itself to Inductor when logging executions, by virtue of you already having authenticated while running a test suite in your development environment. When running in a production environment, you typically will not have already authenticated by interactively running test suites in that environment. Therefore, to ensure that your LLM program is able to authenticate itself to Inductor in order to log executions in non-interactive (e.g., production) environments:
Generate a new Inductor API key by clicking on the circle containing your first initial in the upper righthand corner of the Inductor web UI, then clicking on “API keys” in the dropdown menu, and clicking on “Create a new API key” in the resulting dialog.
Do either one of the following in your production environment:
Set the environment variable
INDUCTOR_SECRET_KEYto your API keyPopulate the file
~/.inductor/credentialswith the JSON object{"secret_key": "YOUR API KEY HERE"}